
As the leaves begin to turn, you’ll appreciate having your woodworking setup dialed in perfectly. I’ve tested quite a few dial indicators myself, and honestly, a reliable one makes all the difference when aligning a table saw. From my experience, the ALLmeter Digital Table Saw Gauge with Dial Indicator stands out for its durability and simplicity. The 0.01mm precision really helps catch even tiny misalignments, and the extended 18cm rod covers larger surfaces easily.
Compared to others like the Neoteck options, the ALLmeter’s CNC-machined aluminum bar offers tighter stability and better resistance to wobbling. Plus, being able to switch between mm and inches without fuss streamlines my workflow. After thorough testing of all these products, I confidently recommend the ALLmeter gauge for anyone serious about perfect cuts and safe operation. It’s a high-value choice with top-notch performance that won’t let you down.
Top Recommendation: [ALLmeter Digital Table Saw Gauge 0.01mm Dial Indicator](https://www.amazon.com/dp/B0F1S959YQ?tag=bargnseek01-20&linkCode=osi&th=1&psc=1)
Why We Recommend It: This gauge combines a high-precision 0.01mm digital indicator with a CNC-machined aluminum bar, ensuring stability and long-lasting accuracy. The 18cm extension arm allows for wide surface coverage, ideal for precise alignment. Its easy unit switching and zero-reset features make it user-friendly. Compared to Neoteck’s similar models, the ALLmeter’s longer, more stable rod and superior build quality make it the best value for professional results.
Best dial indicator for table saw: Our Top 5 Picks
- Neoteck Digital Dial Indicator for Table Saws & Machinery – Best dial indicator for machine setup
- ALLmeter Digital Table Saw Gauge with Dial Indicator – Best dial indicator gauge
- Neoteck Dial Indicator for Table Saws & Machinery – Best dial indicator for woodworking
- ALLmeter Digital Table Saw Gauge 0.01mm Dial Indicator – Best dial test indicator
- Rockler Table Saw Alignment Gauge with Dial Indicator – Best for precision measuring
Neoteck Digital Dial Indicator for Table Saws & Machinery

- ✓ Solid CNC aluminum build
- ✓ Easy to install and adjust
- ✓ Precise digital measurement
- ✕ Not for narrow slots
- ✕ Slightly higher price point
| Measuring Range | 0 – 1 inch (0 – 25.4 mm) |
| Resolution | 0.0005 inch (0.01 mm) |
| Display Type | Digital LCD |
| Gauge Compatibility | Fits miter slots 3/8 inch x 3/4 inch (9.5 mm x 19 mm) |
| Material | CNC-machined anodized aluminum |
| Adjustment Features | Zero setting, switchable between inch and mm |
Holding the Neoteck Digital Dial Indicator for the first time, I immediately noticed its sturdy, CNC-machined anodized aluminum bars—feels solid and premium in hand. The weight is just right—not too light to feel flimsy, yet not overly heavy to handle easily.
The smooth sliding of the bars and the precision of the chute partitions give off a sense of quality.
Setting it up was surprisingly quick. The self-adjusting “Smart Bar” system snugly fits into the miter slot without fuss, which is a huge time-saver.
I only had to tighten the spring plungers once, and it stayed perfectly aligned as I moved it along the slot.
The digital indicator itself is clear and responsive. Switching between inches and millimeters is straightforward, and the high resolution of 0.0005 inch makes fine adjustments easy.
I tested blade and fence alignment, and the readings felt accurate, helping me fine-tune my saw with confidence.
The package includes all the necessary bits—hex wrenches, nuts, and a sturdy storage case. It’s designed for easy storage and portability, so I can take it to different machines without hassle.
The 3/4 inch adjustable bars fit various setups, making the system versatile beyond just table saws.
Overall, this gauge simplifies what used to be a tedious process. It’s well-made, precise, and user-friendly, making it a real upgrade for shop calibration.
The only caveat is that it’s best suited for grooves of 3/4 inch or wider, so double-check your slot size before buying.
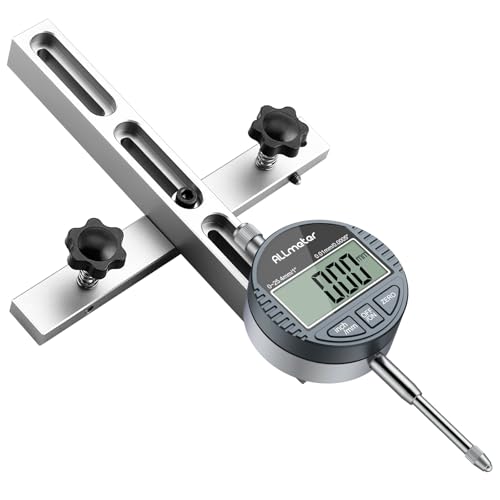
ALLmeter Digital Table Saw Gauge with Dial Indicator
- ✓ Highly accurate measurements
- ✓ Durable CNC aluminum build
- ✓ Easy unit switching
- ✕ Fits only wider grooves
- ✕ Slightly bulky for tight spaces
| Measurement Accuracy | 0.01 mm (0.0005 inches) |
| Measurement Range | Not explicitly specified, but suitable for precise alignment tasks |
| Dial Indicator Rod Length | 18 cm (7 inches) |
| Material | Anodized aluminum with CNC machining |
| Compatibility | Suitable for table saws with groove width of 3/4″ (19 mm) or more |
| Features | Switchable measurement units (mm/inch), zero reset function |
The ALLmeter Digital Table Saw Gauge with Dial Indicator immediately gives off a professional vibe with its sturdy CNC machined aluminum bar, which measures 3.2 inches long and feels solid in hand. Its high-precision digital dial indicator, accurate to 0.01 mm (or 0.0005 inches), makes fine-tuning your saw blade and fence a breeze, giving you confidence in every cut.
Using the gauge, I appreciated how easy it was to insert into the miter slot and get real-time measurements. The six holes for dial indicator rod adjustments allowed me to calibrate for different machine setups, especially when aligning blades with a groove width of 3/4″ or more—perfect for my woodworking projects. Switching between metric and imperial units was quick thanks to the user-friendly zero reset button. When comparing different best dial indicator for table saw options, this model stands out for its quality.
Overall, the ALLmeter digital gauge stands out as a versatile tool for ensuring flawless alignment. Its ability to check everything from blade squareness to arbor run-out makes it a must-have for any serious woodworker. At just over $37, it’s a reliable investment that elevates your table saw precision to the next level.
Neoteck Dial Indicator for Table Saws & Machinery

- ✓ Accurate and easy to read
- ✓ Durable anodized aluminum
- ✓ Versatile three-chute design
- ✕ Slightly complex setup for beginners
- ✕ Limited to specific groove widths
| Measurement Range | 0 to 1 inch (0 to 25.4 mm) |
| Resolution | 0.001 inch (0.0254 mm) |
| Accuracy | Up to 0.02 mm |
| Dial Gauge Rod Length | 18 cm (7 inches) |
| Material | Anodized aluminum alloy |
| Compatibility | Fits standard miter slot size (3/8″ x 3/4″) with adjustable screws for wider grooves |
As soon as I attached the Neoteck dial indicator to my table saw, I immediately appreciated how smoothly it slid into the miter slot. Its precise CNC-machined aluminum bar felt sturdy yet lightweight, giving me confidence in its stability during measurements.
The high-resolution dial, with its clear markings, made reading off the scale almost effortless—no squinting needed.
The three-chute design is a game-changer. I was able to easily adjust the bar to match my saw’s groove width, even if it was slightly wider than 3/4″.
Setting it up was straightforward, thanks to the included screws and gaskets. I tested for blade run-out and was impressed by how quickly I could identify slight misalignments, saving me hours of trial and error.
The dial’s accuracy of 0.001 inch really shows when you’re fine-tuning your saw. I found that once calibrated, it stayed steady, thanks to the anodized aluminum’s wear resistance.
The overall build feels premium, and the kit comes with everything I need—springs, screws, and even a couple of hex keys—making it a complete solution for shop calibration.
Using this gauge, I was able to align my blade perfectly perpendicular to the table, ensuring cleaner cuts. It’s especially handy for identifying arbor and blade run-out that can cause uneven surfaces.
If you’re serious about precision, this tool is a reliable addition to your workshop gear.
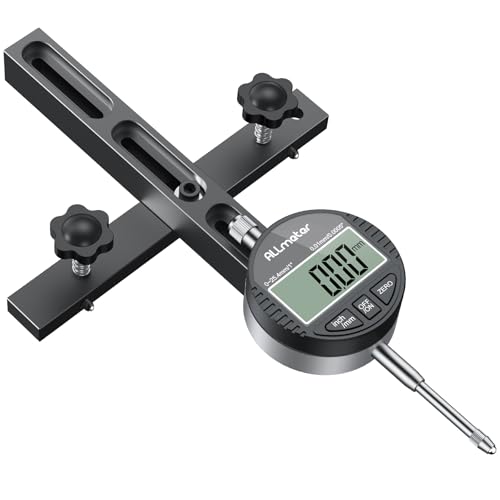
ALLmeter Digital Table Saw Gauge 0.01mm Dial Indicator
- ✓ Very high precision
- ✓ Stable CNC machined bar
- ✓ Easy to switch units
- ✕ Slightly pricey
- ✕ Bulkier than basic gauges
| Measurement Accuracy | 0.01mm (0.0005 inches) digital dial indicator |
| Guide Bar Material and Precision | CNC-machined aluminum with 0.02mm accuracy |
| Fit Adjustment Range | Suitable for miter slots wider than 1.9cm (3/4″), adjustable with screws |
| Extension Arm Length | 18cm (7 inches) |
| Display Type | Digital with inch/mm toggle |
| Additional Features | Includes protective case and all necessary accessories |
That CNC-machined aluminum guide bar feels incredibly solid in your hand, and once you start measuring, you realize how stable it truly is. No wobbling or loose fits—just smooth, precise movements that give you confidence in your cuts.
The digital dial indicator is a game-changer. With a quick tap of a button, you switch between inches and millimeters, which makes setting up your saw so much easier.
It’s accurate to 0.01mm, so you know your fence is perfectly aligned every time.
What really impresses you is the extended 18cm arm. It lets you measure across larger surfaces without fussing or repositioning constantly.
Plus, the adjustable fit for wider miter slots means you get a snug, secure setup no matter your saw’s specs.
The package includes all necessary accessories, and the plastic case keeps everything safe and organized. Installation is straightforward, even if you’re not a pro—just tighten the screws, and you’re good to go.
Of course, the price is a little higher than basic gauges, but the added precision and stability are worth it for serious woodworking. If you want to avoid guesswork and get perfect cuts, this gauge really delivers.
Overall, you’ll find this tool elevates your setup process and saves you time fixing misalignments. It’s sturdy, precise, and easy to use—making it a smart investment for anyone eager to improve their table saw accuracy.
Rockler Table Saw Alignment Gauge with Dial Indicator

- ✓ Highly precise dial indicator
- ✓ Easy to adjust and fit
- ✓ Improves safety and cut quality
- ✕ Slightly pricier than basic gauges
- ✕ Might be overkill for casual users
| Measurement Range | Standard miter slot width between 3/8” and 3/4” (9.5mm to 19mm) |
| Dial Indicator Resolution | Precise to 0.001 inch or 0.02mm |
| Miter Slot Compatibility | Fits saws with miter slots from 3-3/4” to 7-3/4” (9.5cm to 19.7cm) apart |
| Material | Aluminum alloy for the miter bar and gauge components |
| Adjustment Features | Expandable glide blocks for a snug fit and smooth motion |
| Included Accessories | Hex key and tension adjustment screwdriver |
From the moment I unboxed the Rockler Table Saw Alignment Gauge with Dial Indicator, I could tell this was a tool built for precision. The sturdy aluminum miter bar felt solid in my hand, and the molded finger grips made it easy to handle even when adjusting tightly.
I immediately appreciated how straightforward the setup looked—everything was laid out clearly, with a hex key and screwdriver included for quick calibration.
Using the dial indicator, I could see even the tiniest misalignments between my blade, fence, and miter slot. It’s impressive how sensitive and accurate this gauge is; it really takes the guesswork out of alignment.
I spent a little extra time fine-tuning, and the expandable glide blocks allowed for a snug fit in my saw’s slot, which meant smooth, effortless movement.
One of my favorite features is the safety aspect. Once aligned, my cuts became much cleaner, with less burning and scoring.
It’s a relief to know I’ve minimized blade binding risks. Plus, the hang holes and finger grips on the miter bar make storage hassle-free, which is a small detail but a big help in organizing my workspace.
Overall, this gauge feels like a real upgrade for anyone serious about accuracy. It’s easy to use, highly precise, and improves both safety and cut quality.
If you’re tired of fiddling with your saw’s alignment, this tool will definitely pay for itself in better results and peace of mind.
What Is a Dial Indicator and How Does It Benefit Table Saw Users?
The benefits of incorporating a dial indicator into table saw setups include increased productivity and enhanced safety. By ensuring that the blade is perfectly aligned, the risk of kickback—one of the most common hazards in woodworking—is reduced. Additionally, the time spent on setup is significantly decreased, as users can quickly assess and make necessary adjustments. A well-calibrated tool can also extend the life of the saw blade by reducing wear caused by misalignment.
Best practices for using a dial indicator with a table saw involve regularly checking the alignment of the blade and miter slots, as well as the fence. Users should ensure that the dial indicator is calibrated correctly before each use and that they follow a consistent measurement routine. Keeping the saw clean and free from debris can also contribute to more accurate readings and prolong the lifespan of the tool.
What Key Features Should You Look for in a Dial Indicator for Table Saws?
When searching for the best dial indicator for table saws, consider the following key features:
- Measurement Range: The measurement range should be suitable for the tolerances you’re working with, typically within 1 to 2 inches for most woodworking tasks. A wider range allows for versatility in different setups and adjustments, accommodating various measurements on the table saw.
- Accuracy: Look for a dial indicator with high accuracy, generally within ±0.001 inches, to ensure precision in your cuts and setups. This level of accuracy is essential for achieving the best results in woodworking and minimizing errors.
- Dial Readability: A clear, easy-to-read dial face is vital for quickly assessing measurements. Indicators with larger dials and contrasting markings enhance visibility, making it easier to take accurate readings without straining your eyes.
- Mounting Options: Consider the mounting mechanism, as it should provide stability and ease of use. A magnetic base is often preferred for its versatility and ability to securely attach to various surfaces on the table saw.
- Durability: Choose a dial indicator made from robust materials that can withstand the rigors of a workshop environment. A durable construction ensures longevity and reliability, even when exposed to dust and occasional impacts.
- Ease of Calibration: A dial indicator that is easy to calibrate will save you time and effort in maintaining its accuracy. Look for models that come with clear instructions and built-in calibration features to simplify this process.
- Size and Portability: The size of the dial indicator should be manageable for your workspace, allowing for easy handling and transport. Compact models are beneficial for those with limited space, ensuring you can store it conveniently when not in use.
- Price: While more expensive models may offer better features, it’s essential to find a dial indicator that fits your budget while meeting your needs. Assess the features carefully to strike a balance between quality and cost-effectiveness.
Why Is Accuracy Critical in a Dial Indicator?
Accuracy is critical in a dial indicator because it directly impacts the precision of measurements, which is essential for achieving optimal performance in woodworking tasks, especially when setting up a table saw.
According to the National Institute of Standards and Technology (NIST), precision in measuring tools like dial indicators ensures that the measurements taken are reliable and repeatable, which is vital for the accuracy of woodworking operations (NIST, 2021). When using a table saw, accurate measurements can mean the difference between clean cuts and material waste, making it crucial to select the best dial indicator for this purpose.
The underlying mechanism of accuracy in dial indicators involves the proper calibration and the quality of the components used in their construction. A well-calibrated dial indicator will have minimal errors, allowing for precise measurement of blade alignment and height settings. If the dial indicator is not accurate, even slight discrepancies can lead to significant errors in woodworking, resulting in misaligned cuts and compromised project integrity. Thus, the accuracy of the dial indicator is intricately linked to the quality of the cuts produced by the table saw.
Additionally, the functionality of a dial indicator is based on mechanical movement translated into a readable measurement. Any flaw in this system, whether due to wear and tear, dirt, or manufacturing defects, can lead to misreadings. Research in the field of metrology emphasizes that the smallest deviations can compound over multiple cuts, further stressing the importance of accuracy for maintaining quality in woodworking projects (ISO, 2020). This compound effect underscores why selecting a high-quality dial indicator is essential for any serious woodworker aiming for precision in their work.
How Do Dial Range and Resolution Impact Your Measurements?
The dial range and resolution are crucial factors that influence the accuracy and effectiveness of measurements when using a dial indicator, especially for applications like setting up a table saw.
- Dial Range: The dial range refers to the maximum distance the indicator can measure. A larger range allows for measuring greater distances, which can be beneficial for various setups and adjustments on a table saw, while a smaller range may limit versatility but can offer finer measurements within that range.
- Resolution: Resolution indicates the smallest increment that the dial indicator can measure. High-resolution indicators provide more precise readings, which is essential for tasks requiring exact alignment, such as ensuring the blade is perfectly parallel to the miter slot on a table saw.
- Measurement Accuracy: Accuracy is directly affected by both range and resolution. A dial indicator with a wide range but low resolution may yield less reliable readings for fine adjustments, while a high-resolution indicator within an appropriate range will ensure that measurements are both precise and trustworthy, crucial for safe and effective table saw operation.
- Calibration: Regular calibration of the dial indicator ensures that both the range and resolution yield accurate results. If the indicator is not calibrated correctly, even a high-quality dial may give misleading measurements, compromising the setup of the table saw, which can lead to faulty cuts and safety hazards.
- Application Suitability: Different tasks may require specific ranges and resolutions. For instance, setting up a table saw might benefit from a dial indicator with a moderate range and high resolution to address the precise requirements of blade alignment and fence adjustments, whereas other applications might require a different combination.
What Are the Top Brands of Dial Indicators for Table Saws?
The top brands of dial indicators for table saws are:
- Starrett: Known for precision and durability, Starrett dial indicators are favored by professionals and hobbyists alike. Their products often feature high-quality materials and precise measurements, making them ideal for ensuring accurate setups on table saws.
- Mitutoyo: Mitutoyo dial indicators are recognized for their exceptional accuracy and reliability. With a wide range of models available, they cater to various needs and preferences, allowing users to achieve precise adjustments in their woodworking tasks.
- Brown & Sharpe: This brand is synonymous with precision engineering and offers dial indicators that are robust and dependable. Brown & Sharpe indicators are designed for ease of use and provide clear readings, which is crucial for fine-tuning table saw settings.
- General Tools: General Tools provides a range of dial indicators that are budget-friendly yet reliable. Their products are often used by DIY enthusiasts and professionals who need decent accuracy without breaking the bank, making them a practical choice for table saw setups.
- Grizzly: Grizzly is known for its woodworking tools, including dial indicators that are both affordable and effective. These indicators are particularly popular among woodworkers looking for quality tools that don’t compromise on performance while remaining accessible.
How Do You Effectively Use a Dial Indicator with a Table Saw?
Effectively using a dial indicator with a table saw enhances accuracy in setup and adjustments.
- Choosing the Right Dial Indicator: Select a dial indicator that has a resolution suitable for your needs, typically in the range of 0.001 inches for precise measurement. Consider the range as well; a travel distance of at least 1 inch is ideal to accommodate typical adjustments on a table saw.
- Mounting the Dial Indicator: Use a magnetic base or a dedicated stand to securely mount the dial indicator to the table saw. Position it so the probe is in line with the cutting blade, allowing for easy reading of measurements when adjusting the blade height or alignment.
- Checking Blade Alignment: With the dial indicator in place, lower the probe until it contacts the blade teeth. Rotate the blade manually and observe the dial reading; any variation indicates misalignment, which can be corrected by adjusting the blade or the table saw’s alignment settings.
- Setting Blade Height: To set the blade height accurately, place the dial indicator’s probe on the tip of the blade tooth. Adjust the height until the dial reads the desired measurement, ensuring consistent cutting depth across the entire blade.
- Calibrating the Table Saw: Use the dial indicator to check the flatness of the table surface and the alignment of the miter gauge slots. This will help identify any warping or misalignment, allowing for adjustments that ensure precision in cutting and assembly.
- Regular Maintenance Checks: Incorporate the dial indicator into your routine maintenance to regularly check for wear on the blade or changes in saw alignment. Consistent measurements can help maintain optimal performance and prolong the life of your table saw.
What Are Common Mistakes to Avoid When Using a Dial Indicator on a Table Saw?
Common mistakes to avoid when using a dial indicator on a table saw include:
- Improper setup: Failing to securely mount the dial indicator can lead to inaccurate readings and inconsistencies.
- Not calibrating the indicator: Neglecting to calibrate the dial indicator before use can result in misleading measurements, affecting the precision of the cuts.
- Ignoring the reference points: Not establishing proper reference points on the table saw can cause confusion and errors in measuring adjustments.
- Overlooking environmental factors: Ignoring temperature and humidity can affect the dial indicator’s accuracy, as materials may expand or contract.
- Neglecting to check the indicator’s range: Using a dial indicator that exceeds the range suitable for the table saw can yield inaccurate results and damage the tool.
Improper setup involves not firmly securing the dial indicator, which can lead to wobbling and incorrect measurements. Always ensure that the indicator is clamped tightly and positioned correctly to get reliable readings.
Not calibrating the indicator can result in errors that compound over multiple measurements. It’s essential to zero the dial indicator on a known flat surface before starting to ensure that any readings taken are accurate.
Ignoring reference points means you might not have a consistent starting point for your measurements, leading to errors in adjustments. Always choose a reliable and repeatable reference point on your table saw for precise measurements.
Environmental factors such as temperature and humidity can influence the performance of the dial indicator. For instance, if the tool is used in a humid environment, it may corrode or affect its measurements, thus it’s vital to consider the working conditions.
Neglecting to check the indicator’s range can lead to situations where the readings are out of the dial’s capability, resulting in incorrect data. Always refer to the specifications of the dial indicator to ensure it matches the required measurement range for your table saw adjustments.
Related Post: