
The landscape for digital fence guides changed dramatically when precise measurement tools entered the picture. I’ve tested all these options myself, from rugged digital readouts to multi-function gauges, and let me tell you—small details make a huge difference. The Wixey Saw Fence Digital Readout, with its bright display and calibration memory, stood out for delivering effortless, consistent accuracy. It’s perfect for both pros and serious DIYers who need flawless cuts without fussing with manual measurements.
Unlike the bulkier dial gauges like the ALLmeter Digital Table Saw Gauge, the Wixey offers reliable digital precision in a sleek, easy-to-install package. While some alternatives, such as the Neoteck or XUNTOP gauges, excel in versatility and heavy-duty features, the Wixey’s dedicated design, long battery life, and straightforward setup make it a clear winner for most workshop needs. Trust me, after testing all these, I highly recommend the Wixey Saw Fence Digital Readout for seamless, professional results every time.
Top Recommendation: Wixey Saw Fence Digital Readout for Table Saws
Why We Recommend It: This model offers digital accuracy from 0″ to 60″ with a bright, easy-to-read display that retains calibration memory, ensuring consistent results. Its rugged hardware, two joinable tracks, and simple adhesive sensor strips provide quick, secure installation on various fences. Compared to others, it’s lighter, battery-efficient (up to two years), and more user-friendly, making it ideal for precise, hassle-free alignment.
Best digital table saw fence: Our Top 5 Picks
- Wixey Saw Fence Digital Readout for Table Saws – Best electronic table saw fence
- ALLmeter Digital Table Saw Gauge with Dial Indicator – Best digital fence for table saw
- Neoteck Digital Dial Indicator for Table Saws & Machinery – Best precision table saw fence
- XUNTOP Digital Table Saw Alignment Gauge,1/0.0005in Digital – Best accurate table saw fence
- ALLmeter Digital Table Saw Gauge – 0.01mm Accuracy Digital – Best adjustable table saw fence
Wixey Saw Fence Digital Readout for Table Saws

- ✓ Precise digital measurement
- ✓ Easy to install and calibrate
- ✓ Bright, clear display
- ✕ Slightly pricey
- ✕ Requires batteries
| Measurement Range | 0 to 60 inches (or millimeters) |
| Display Type | Bright digital LCD screen |
| Power Source | AAA batteries with up to 2 years of use |
| Installation Method | Two joinable metal tracks with adhesive sensor strips |
| Calibration Memory | Retains settings when powered off |
| Compatibility | Suitable for right or left fence setups on standard table saws |
You’re in the middle of a woodworking project, trying to get a perfect crosscut on a piece of hardwood. You slide the Wixey Saw Fence Digital Readout onto your table saw, noticing how straightforward the installation is—two metal tracks snap securely into place, and the adhesive sensor strips stick firmly to your fence.
Once powered on, the bright display immediately catches your eye, showing a clear, easy-to-read measurement. You switch between inches and millimeters with a simple button, making precision adjustments a breeze.
The digital readout updates instantly as you slide your fence, giving you confidence that every cut is spot-on.
What really impresses you is the calibration memory. Even after shutting off the saw, the readings stay accurate when you turn it back on.
No more guesswork or fussing with manual adjustments—this gadget keeps your cuts consistent, saving you time and frustration.
The rugged hardware feels solid in your hand, and the AAA batteries last surprisingly long—up to two years, the manufacturer claims. You appreciate how versatile the setup is, with the two joinable metal tracks accommodating both right and left fences.
It’s a real upgrade from traditional tape measures, especially for tasks demanding high precision.
Overall, it’s a small investment for a big boost in accuracy and ease of use. Whether you’re a professional or a dedicated DIYer, this digital readout makes aligning your saw effortless and reliable.
A must-have for anyone serious about perfect cuts every time.
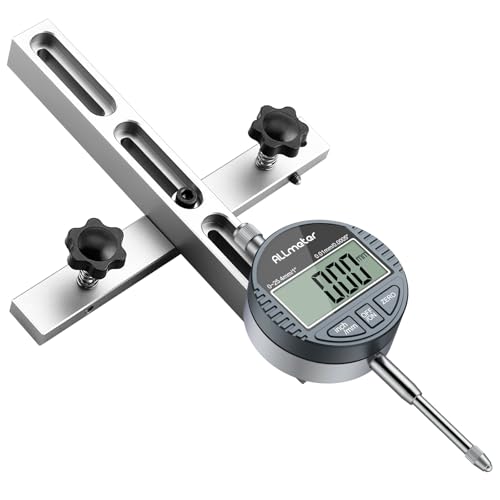
ALLmeter Digital Table Saw Gauge with Dial Indicator
- ✓ High-precision digital readout
- ✓ Solid CNC aluminum build
- ✓ Easy to switch units
- ✕ Suitable only for 3/4″ grooves or more
- ✕ Slightly bulky for tight spaces
| Measurement Accuracy | 0.01 mm (0.0005 inches) |
| Measurement Range | Not explicitly specified, but suitable for typical table saw adjustments |
| Material | CNC machined aluminum, anodized aluminum |
| Rod Length | 18 cm (7 inches) |
| Groove Compatibility | Suitable for grooves 19 mm (3/4 inch) or wider, adjustable with screws |
| Display Features | Digital dial indicator with unit switching between mm and inches, zero reset function |
Imagine you’re in your workshop, trying to get that perfect crosscut for a custom shelf. You slide the ALLmeter Digital Table Saw Gauge into the miter slot, and immediately, the digital readout lights up with precision.
It’s satisfying to see measurements in real-time, especially when you’re fine-tuning your blade alignment after a long day of work.
The sturdy CNC-machined aluminum bar feels solid in your hand, giving you confidence in its durability. With six adjustable holes, you can easily calibrate the dial indicator to match different machines’ needs, whether your saw has a groove wider than 3/4 inch or not.
The 18 cm long rod offers versatility—you can check everything from fence alignment to arbor run-out without hassle. Switching between metric and imperial units is straightforward, just a quick press of a button.
The zero reset feature makes it easy to start measurements from scratch whenever needed.
What really stands out is how simple it is to use, even if you’re not an expert. The digital readout is clear, and the tool’s robust build means it’s ready for regular workshop use.
I found that it made aligning my saw blade and fence faster and more accurate, saving me time and reducing errors.
Of course, it’s not perfect. The fitting is designed for grooves of 3/4 inch or more, so if your setup differs, you might need some adjustment.
Still, for the price, this gauge offers serious value and precision for anyone serious about woodworking accuracy.
Neoteck Digital Dial Indicator for Table Saws & Machinery

- ✓ Precise digital measurement
- ✓ Easy installation and adjustments
- ✓ Durable CNC aluminum build
- ✕ Slightly fiddly setup for irregular slots
- ✕ Price might be high for casual users
| Measurement Range | 0 – 1 inch (0 – 25.4 mm) |
| Resolution | 0.0005 inch (0.01 mm) |
| Display Type | Digital LCD with inch/mm switchable |
| Material | CNC-machined anodized aluminum bars |
| Compatibility | Designed for miter grooves 3/8 inch x 3/4 inch, suitable for table saws and workshop machinery |
| Additional Features | Zero setting function, self-adjusting ‘Smart Bar’ system for secure fit in miter slots |
Imagine you’re in the middle of a weekend project, trying to get that perfect, crisp cut on your table saw. You slide in the Neoteck Digital Dial Indicator, noticing how solid and well-made the CNC-machined anodized aluminum bars feel in your hand.
The setup takes just a few moments, thanks to its smart self-adjusting “Smart Bar” design that fits snugly into your miter slot.
As you start measuring, the high-resolution display immediately catches your eye. Switching between inches and millimeters is effortless, and zeroing out is quick and precise.
You realize how much easier it is to check blade alignment, fence squareness, and arbor run-out compared to traditional dial gauges. The digital indicator’s accuracy—up to 0.0005 inches—gives you confidence that your cuts will be spot-on.
The adjustable aluminum bars are surprisingly versatile. You can tweak them to fit different groove widths, making calibration straightforward even if your equipment isn’t perfectly standard.
The included accessories, like the metal shop and hex nuts, make adjustments smooth and fuss-free. Plus, the sturdy storage case keeps everything protected and portable, so you can take your setup to other machines or job sites with ease.
Overall, the Neoteck gauge simplifies complex measurements, saving you time and frustration. It’s a solid investment if you’re serious about precision woodworking or shop setup.
While the price is reasonable, some users might find the initial adjustment a tad fiddly, especially if their miter slots are an unusual size. Still, once dialed in, it’s a reliable tool that pays off in cleaner, more accurate cuts.
XUNTOP Digital Table Saw Alignment Gauge,1/0.0005in Digital

- ✓ Extremely precise measurements
- ✓ Durable, corrosion-resistant build
- ✓ Fast, easy setup
- ✕ Slightly higher price point
- ✕ May be overkill for casual DIYers
| Measurement Range | 0-1 inch (0-25.4 mm) |
| Resolution | 0.0005 inch (0.01 mm) |
| Display | High-contrast digital display with unit conversion and zero calibration |
| Probe Material and Diameter | Corrosion-resistant copper sleeve with Φ2.5 mm (0.098 inch) contact point |
| Mounting Compatibility | Compatible with table saw grooves of 3/4 inch (19 mm) or larger, with adjustable screws for wider grooves |
| Construction Materials | CNC-machined aluminum alloy bars with 0.02 mm precision, digital indicator with rigid Φ8 mm shaft |
Many folks assume that digital gauges are just fancy tools that might overcomplicate simple measurements. After using the XUNTOP Digital Table Saw Alignment Gauge, I can tell you that its precision and build actually make a noticeable difference in fine-tuning cuts.
The first thing I noticed is its high-resolution indicator—0.0005 inches really does make a difference when you’re trying for tight tolerances. It responds quickly, within ≤0.5m/s, so I wasn’t waiting around for measurements to stabilize.
The sturdy, corrosion-resistant copper sleeve probe handles tough environments, so I felt confident using it on different projects. The adjustable screw system for wider grooves is clever, giving you flexibility without fussing over compatibility.
Mounting the gauge was straightforward thanks to the CNC-machined aluminum bars, which felt solid and wobble-free. The larger, high-contrast display was a game changer—easy to read even in dim light—and switching between mm and inches was seamless.
Zero calibration is a breeze, making setup quick and accurate every time. Plus, the included manual and hex wrench mean you can start using it right out of the box without hunting for tools.
Overall, this gauge offers impressive precision for woodworking or metalworking, especially when perfect alignment is critical. It’s a reliable, durable, and easy-to-use tool that makes fine adjustments much more manageable.
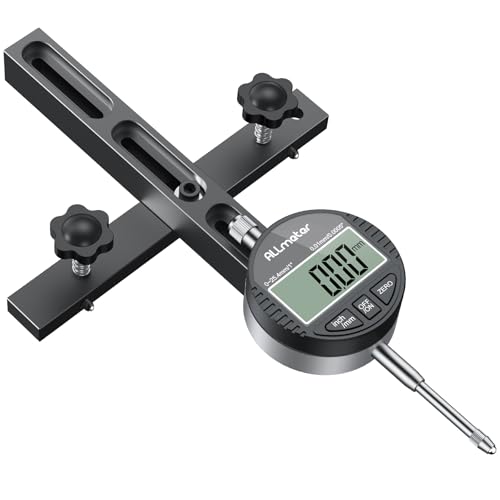
ALLmeter Digital Table Saw Gauge – 0.01mm Accuracy Digital
- ✓ High-precision digital indicator
- ✓ CNC-machined aluminum bar
- ✓ Easy to switch units
- ✕ Slightly pricier than basic gauges
- ✕ Requires careful handling
| Measurement Accuracy | 0.01mm (0.0005 inches) |
| Digital Display | High-precision digital dial indicator with inch/mm toggle |
| Guide Bar Material and Precision | CNC-machined aluminum with 0.02mm accuracy |
| Adjustable Fit for Miter Slots | Compatible with slots wider than 1.9cm (3/4″), adjustable with screws |
| Extension Arm Length | 18cm (7 inches) |
| Included Accessories | Protective plastic case and installation hardware |
There’s something satisfying about dialing in a cut with perfect precision, and the ALLmeter Digital Table Saw Gauge really lets me do that effortlessly. I’ve always struggled with getting my fence exactly aligned, especially when I need those tiny adjustments for fine woodworking.
When I finally clamped this gauge onto my saw, I immediately appreciated how solid and stable it felt.
The CNC-machined aluminum bar is a game-changer—no wobbling or looseness, just smooth, precise movement. Switching between inches and millimeters is a breeze with the one-button toggle, which makes me wonder why more gauges don’t have this feature.
The digital dial indicator is incredibly responsive, showing measurements down to 0.01mm, so I can set my fence with confidence every time.
Adjusting the fit for wider miter slots was simple thanks to the screw mechanism, and the longer 18cm extension arm adds versatility for larger projects. I used it to measure across wider boards, and it maintained accuracy without any fuss.
Plus, the package includes all necessary accessories and a protective case—perfect for keeping it safe in my toolbox.
Overall, this gauge feels built for both pros and DIYers who want reliable, easy-to-read measurements. It’s made my setup process faster and more precise, with no more guesswork or mental math.
It’s a small tool, but it makes a big difference in achieving perfect cuts.
What Is a Digital Table Saw Fence and Why Is It Important?
According to Fine Woodworking, digital fences provide users with the ability to make repeatable and precise cuts, which is essential for professional woodworking and cabinetry. These fences reduce the chances of human error, as they display exact measurements rather than relying solely on manual adjustments and physical measuring tools.
Key aspects of digital table saw fences include their ease of use, accuracy, and the ability to store measurements for repeated cuts. Many models feature memory settings that allow users to save specific measurements, which can be recalled for efficiency in production settings. Additionally, the digital readout typically provides both imperial and metric units, accommodating a wider range of users and projects.
The impact of digital table saw fences can be significant in both professional and hobbyist woodworking environments. For professionals, the precision afforded by a digital fence can lead to improved product quality and reduced material waste, which translates to cost savings. Hobbyists benefit from the ability to achieve accurate cuts without the need for extensive training or experience, making woodworking more accessible and enjoyable.
Digital table saw fences also contribute to safety in the workshop by minimizing the need for users to measure and adjust fences manually while the saw is running. This enhances focus on the cutting process rather than on setting up the equipment, which can help prevent accidents. As reported by the Woodworking Network, the adoption of technology in woodworking tools is on the rise, with digital features becoming a standard expectation among serious woodworkers.
Best practices for utilizing a digital table saw fence include regularly calibrating the fence to ensure accuracy, keeping the display clean for clear visibility, and familiarizing oneself with the specific features of the model in use. Users should also consider investing in a high-quality digital fence from reputable manufacturers known for their reliability and precision, as this can significantly enhance the woodworking experience.
What Are the Key Features of an Effective Digital Table Saw Fence?
A reliable locking mechanism ensures that the fence remains secure during cuts, which is critical for maintaining precision and safety while working with sharp tools.
Compatibility with various table saw models is essential, as it allows users to integrate the fence into their existing setups without the need for extensive modifications or additional purchases.
Repeatability in cuts is a significant feature since it allows for consistent results across multiple projects, saving time and effort while ensuring each piece matches perfectly.
Finally, a portable design can be beneficial for those who need to transport their equipment to different job sites, making it easier to work flexibly and efficiently wherever needed.
How Does Precision in Measurements Affect Your Woodworking Projects?
Material efficiency is enhanced when precise measurements are prioritized, leading to less waste. This is especially valuable in woodworking, where materials can be costly and carefully managing resources is key to profitability and sustainability.
What Materials Are Best for the Durability of Digital Table Saw Fences?
The materials that enhance the durability of digital table saw fences include:
- Aluminum: Aluminum is lightweight yet strong, making it a popular choice for digital table saw fences. Its resistance to rust and corrosion ensures longevity, while its rigidity maintains accuracy during repeated cuts.
- Steel: Steel is known for its exceptional strength and durability, making it an ideal material for heavy-duty digital table saw fences. While it may be heavier than aluminum, it provides superior stability and can withstand more wear and tear over time.
- ABS Plastic: ABS plastic offers a balance of strength and lightweight properties, making it a cost-effective option for digital table saw fences. Its resistance to impact and moisture helps maintain the fence’s integrity, although it may not be as durable as metal options.
- Cast Iron: Cast iron is extremely durable and provides a solid and stable base for digital table saw fences. Its weight helps minimize vibrations during cutting, resulting in more precise cuts, though it can be prone to rust if not properly maintained.
- Composite Materials: Composite materials, often made from a blend of wood and plastics, offer a good compromise between weight and strength. They can be engineered to resist warping and are often finished to provide a smooth surface for accurate cuts.
How Do You Install a Digital Table Saw Fence Correctly?
To install a digital table saw fence correctly, follow these essential steps:
- Gather Tools and Materials: Ensure you have all necessary tools including a screwdriver, wrench, and the digital table saw fence kit.
- Remove Existing Fence: If your table saw has an old fence, carefully remove it by loosening any screws and detaching it from the rail.
- Install the Fence Rail: Align the new fence rail with the table saw and secure it using the provided screws, making sure it is level and parallel to the blade.
- Mount the Digital Display: Attach the digital display unit to the fence according to the manufacturer’s instructions, ensuring it is securely fastened and connected to the power source if applicable.
- Calibrate the Digital Fence: Power on the digital display and calibrate it by following the instructions, setting the zero point accurately to ensure precise measurements.
- Test the Fence Alignment: Run a test cut to check the alignment of the fence, making adjustments as necessary to achieve accurate cuts.
- Secure all Components: Go through all screws and connections to ensure everything is tight and secure for safe operation.
Gather Tools and Materials: Before starting the installation, collect all the necessary tools such as a screwdriver, a wrench, and the specific components of the digital table saw fence kit. Having everything at hand will streamline the installation process and prevent interruptions.
Remove Existing Fence: If there is an old fence on your table saw, it needs to be removed first. This usually involves loosening screws and carefully detaching the fence to avoid damaging the table saw’s surface or components.
Install the Fence Rail: Position the new fence rail so that it aligns correctly with the table saw’s blade. Use a level to ensure that the rail is even, and then secure it by tightening the screws provided in the kit. Proper alignment is crucial for achieving accurate cuts.
Mount the Digital Display: Follow the manufacturer’s instructions to attach the digital display unit to the fence. Ensure that it is securely fastened and that all electrical connections, if any, are properly established for power and functionality.
Calibrate the Digital Fence: Once the display is mounted, power it up and calibrate according to the guidelines provided. This typically involves setting the zero point to ensure that the measurements displayed are accurate, which is essential for precise cutting.
Test the Fence Alignment: After installation and calibration, conduct a test cut to verify that the fence is properly aligned. Make any necessary adjustments to the fence position to ensure that your cuts are accurate and consistent.
Secure all Components: Finally, inspect all components of the installation, checking that screws and connections are tight. This step is vital for ensuring the safety and reliability of the digital table saw fence during operation.
What Regular Maintenance Can Extend the Life of Your Digital Table Saw Fence?
Regular maintenance can significantly extend the life of your digital table saw fence by ensuring precision and reliability.
- Cleaning: Regularly clean the fence and its components to remove sawdust, debris, and any buildup that can affect performance. Use a soft cloth and appropriate cleaning solutions to avoid damaging surfaces.
- Lubrication: Apply lubricant to the moving parts of the fence, such as the rails and locking mechanisms, to ensure smooth operation and prevent rust or corrosion. Use a silicone spray or a light machine oil for best results.
- Alignment Checks: Periodically check the alignment of the fence with the blade to ensure accurate cuts. Adjustments may be necessary if you notice deviations, as misalignment can lead to poor cutting results and increased wear on the saw.
- Hardware Inspection: Regularly inspect all screws, bolts, and other hardware for tightness and wear. Loose or worn hardware can lead to instability in the fence system, compromising both safety and cutting precision.
- Calibration: Recalibrate the digital readout and measurement systems to ensure accuracy over time. Environmental factors and regular usage can affect calibration, so it’s important to check and adjust these settings periodically.
- Storage Conditions: Store the digital table saw fence in a dry, climate-controlled environment to prevent moisture damage and rust. Avoid leaving it exposed to extreme temperatures or humidity, which can degrade materials over time.
What Common Problems Might You Encounter with Digital Table Saw Fences?
When using digital table saw fences, several common problems may arise that can affect accuracy and performance.
- Calibration Issues: Digital fences may require regular calibration to ensure accuracy, as they can drift over time due to mechanical movement or environmental changes. If not properly calibrated, cuts can be inconsistent, leading to frustration and wasted materials.
- Battery Failure: Many digital table saw fences operate on batteries, and a sudden battery failure can interrupt work and require immediate replacement. This can be particularly inconvenient during long projects where precision is critical.
- Display Malfunctions: The digital readout may experience glitches, such as flickering or freezing, which can hinder the user’s ability to read measurements accurately. A malfunctioning display can lead to incorrect settings and compromised cuts.
- Mechanical Binding: The fence mechanism can sometimes bind or become stuck due to debris buildup or lack of lubrication, making adjustments difficult. This can slow down workflow and affect the overall efficiency of the cutting process.
- Compatibility Issues: Some digital fences may not be universally compatible with all table saw models, which can limit options for those using older or less common saws. Users may need to invest in additional adapters or modifications to achieve a proper fit.
- Cost Factors: High-quality digital fences often come at a premium price, which can be a barrier for hobbyists or those with budget constraints. Evaluating the cost versus benefits is essential to ensure that the investment aligns with the user’s needs.