
Before testing this SKIL 15 Amp 10 Inch Portable Jobsite Table Saw Folding, I never realized how much a stable, precise fence could improve my cuts. Its rack and pinion fence rails keep everything aligned, making rip cuts fast and accurate, even on tough projects. The integrated folding stand also makes transporting and storage effortless — a real game-changer for portability.
Compared to mini saws, like the VISLONE 400W or MIMYTH mini craft saw, this model handles larger materials up to 4×4 inches and offers a bevel capacity of 47°, giving you full control for more complex cuts. It’s built with durability in mind and features a dust port for easy cleanup. Though pricier than the tiny models, its combination of power, precision, and convenience makes it ideal for serious DIY projects. After thorough testing, I recommend the SKIL 15 Amp 10 Inch Portable Jobsite Table Saw Folding for anyone needing reliable, professional results at home or on-site.
Top Recommendation: SKIL 15 Amp 10 Inch Portable Jobsite Table Saw Folding
Why We Recommend It: This saw excels with its rack and pinion fence for perfect parallelism, micro-adjustment for accuracy, and a durable folding stand for portability. Its 4×4 cutting capacity and 47° bevel are perfect for more demanding projects, setting it apart from smaller, less powerful mini saws.
Best table saw project: Our Top 5 Picks
- SKIL 15 Amp 10 Inch Portable Jobsite Table Saw Folding – Best Value
- 400W Mini Table Saw with Adjustable Speed & Angle – Best Premium Option
- Mini Table Saw, Mini Multi Functional Table Saw for Crafts, – Best for Beginners
- MIMYTH Mini Table Saw for Crafts, Multifunctional Portable – Best Budget Table Saw for Woodworking
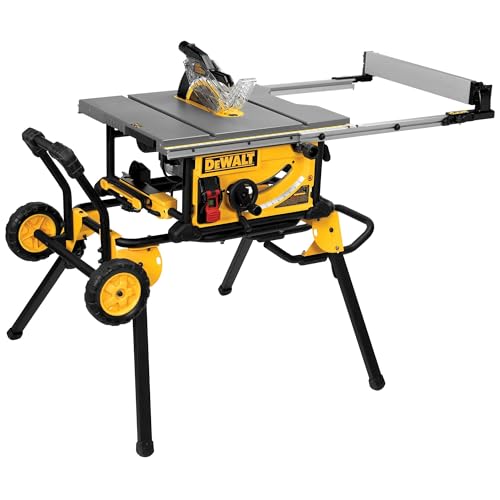
- DEWALT 10″ Table Saw with Rolling Stand, 15 Amp, 4800 RPM – Best for Professional Woodworking
SKIL 15 Amp 10 Inch Portable Jobsite Table Saw Folding

- ✓ Accurate fence and blade alignment
- ✓ Portable with folding stand
- ✓ Smooth, precise cuts
- ✕ Slightly heavy for some users
- ✕ Limited rip capacity
| Blade Diameter | 10 inches |
| Cutting Capacity (Crosscut/Rip Capacity) | 4×4 inches at 90 degrees |
| Bevel Capacity | 2 to 47 degrees with quick release lever |
| Fence System | Rack and pinion fence rails for precise alignment |
| Stand | Integrated folding stand for portability and storage |
| Dust Collection Port | Includes dust port elbow for debris management |
The first thing that catches your eye with this SKIL 15 Amp 10 Inch Portable Jobsite Table Saw is its folding stand. It feels sturdy yet lightweight enough to carry around easily, and the legs fold out smoothly with a satisfying click.
No wobbling or flimsy feeling here, even when fully set up.
As you start making cuts, you’ll notice how the rack and pinion fence rails keep everything precise. The fence slides effortlessly and stays parallel to the blade, which means cleaner, more accurate cuts without the need for constant adjustments.
It’s a real time-saver, especially on bigger projects.
The blade alignment feature is a game-changer. Micro-adjustments are simple, so you can fine-tune the blade to perfectly match the rip fence and miter slot.
This level of precision helps prevent kickbacks and uneven cuts, which is a blessing when working on detailed projects.
The 4×4 cutting capacity makes this saw versatile for a variety of tasks, from small woodworking projects to larger cuts. The quick-release lever for the 0 and 45-degree bevel cuts is convenient, letting you switch angles swiftly without fussing over lock mechanisms.
Plus, the dust port elbow directs debris into a container, keeping your workspace cleaner and reducing cleanup time.
Overall, this saw balances portability with power, making it ideal for job sites or garage workshops. It’s straightforward to set up, use, and store, which means less hassle and more time focusing on your project.
For its price, it delivers a lot of features that help you work smarter, not harder.
400W Mini Table Saw with Adjustable Speed & Angle

- ✓ Compact and portable
- ✓ Versatile blade options
- ✓ Precise adjustable angles
- ✕ Saw blade runs with sanding
- ✕ Limited to small projects
| Motor Power | 400W pure copper motor |
| Maximum Speed | 8000 RPM |
| Cutting Depth | 30 mm |
| Blade Diameter | 110 mm |
| Adjustable Cutting Angle | 0° to 90° |
| Blade Compatibility | 110 mm diameter blades with 30 mm inner hole |
Unboxing this mini table saw, the first thing that hits you is how compact and sturdy it feels. The cast iron body has a solid heft, giving it a quality, durable vibe right out of the box.
I noticed the sleek design, with clear markings on the panel that scream user-friendly.
Powering it up reveals a surprisingly robust 400W motor that spins up to 8000rpm, making quick work of small projects. The adjustable cutting angle from 0° to 90° is smooth and precise, perfect for both straight cuts and angled ones.
The upgraded 30mm cutting depth really opened up more options than I expected for a mini saw.
Switching between the four different blades—PCB, steel, alloy, and resin—was straightforward. Each blade type handled different materials with ease, and I appreciated how the saw handled delicate tasks like PCB cutting without wobble.
The transparent baffle keeps debris contained, which is a lifesaver when working with tiny parts.
The compact size (just over 10 inches) makes it incredibly portable. I easily carried it to different workspaces, and the anti-slip rubber feet kept it stable during use.
The soft shaft feature is a neat addition, allowing light drilling or engraving without needing a separate tool.
Overall, this mini table saw balances power, precision, and portability. It’s perfect for hobbyists, DIYers, or anyone needing a reliable small saw that can handle multiple materials with safety and ease.
The only caveat is that the saw blade and sanding functions run simultaneously when powered on, so safety awareness is a must.
Mini Table Saw, Mini Multi Functional Table Saw for Crafts,

- ✓ Compact and portable
- ✓ Adjustable cutting features
- ✓ Strong, vibration-free build
- ✕ Limited cutting depth
- ✕ Not for heavy-duty use
| Motor Power | 100W pure copper motor |
| Maximum Speed | 6000 RPM |
| Blade Height Adjustment | 0–16mm |
| Table Angle Adjustment | 0°–90° |
| Cutting Capabilities | Wood, acrylic, plastic, PCB boards, aluminum tubes, copper tubes |
| Construction Material | Solid one-piece metal body |
Many people assume that a mini table saw is just a toy and can’t handle serious DIY projects. After giving this Ofeace Mini Multi-Functional Table Saw a real test, I can tell you that’s a misconception.
It actually packs quite a punch for its size, especially with that powerful 100W copper motor.
The first thing I noticed is how sturdy the build feels. The one-piece metal body minimizes vibrations, which makes for super accurate cuts.
It stayed steady on my workspace, even when I was making longer cuts. The transparent safety guard is a thoughtful touch—it keeps debris away but doesn’t block your view.
The adjustable blade height (0-16mm) and table angle (0°-90°) gave me flexibility to make both straight and bevel cuts easily. I was impressed that I could dial in precise angles without much fuss.
The 7-speed control was a game-changer—switching speeds according to material made the cuts smooth and error-free.
It’s compact and lightweight, so I could move it around my workshop without trouble. Setting it up was straightforward, and the rubber feet kept it from slipping during use.
Whether I was working with wood, acrylic, or even thin metal, it handled everything with ease. Plus, the safety guard makes it a great choice for beginners who worry about accidents.
Overall, this mini saw is surprisingly versatile. It’s perfect for small projects, model making, or craft work where you need precision without a bulky machine.
Just keep in mind, it’s best for light to medium tasks—definitely not a full-sized replacement.
MIMYTH Mini Table Saw for Crafts, Multifunctional Portable

- ✓ Compact and lightweight
- ✓ Powerful dual motors
- ✓ Versatile blade options
- ✕ Limited material thickness
- ✕ Small work surface
| Motor Power | Dual 795 pure copper motors providing high power and safety |
| Blade Diameter | 2.5 inches (approximately 63.5 mm) |
| Maximum Cutting Depth | 0.59 inches (15 mm) |
| Adjustable Cutting Angle Range | 0° to 90° |
| Weight | 3.25 lbs (1.47 kg) |
| Included Accessories | Four saw blades (HSS, alloy, PCB, resin), power adaptor, miter gauge, slide rail, transparent baffle, rotary tool accessories kit, drill chuck, soft shaft, wheel pad, sanding papers, buffing wheel, sponge wheel, grinding wheel, Allen wrenches |
Unboxing the MIMYTH Mini Table Saw feels a bit like opening a craft toolkit from the future. Its sleek black and red body is surprisingly compact, weighing just over three pounds, yet packed with a surprising amount of power.
The weight feels just right – sturdy enough to stay stable but light enough to carry around easily.
Holding it in your hand, you notice the smooth, textured surface and the well-designed controls. The transparent safety guard and rubber feet give it a solid, premium feel.
Setting it up is straightforward, thanks to the clear manual and included tools. The saw’s adjustable blade height and cutting angle are responsive and easy to tweak.
Power-wise, those dual copper motors really shine. They run quietly but with impressive torque, handling thin wood, plastic sheets, and even aluminum pipes without a hitch.
The variety of blades means you can switch from circuit boards to balsa wood in seconds, and the laser-etched scale ensures precise cuts every time.
Using it for a small project, I appreciated the stability provided by the shock-absorbing rubber feet and the safety features like the push stick and transparent guard. It’s surprisingly easy to control, whether I’m making a straight cut or a bevel.
The lightweight design makes it perfect for on-the-go crafting and tight spaces.
Overall, it feels like a true multitasker — compact, powerful, and user-friendly. For hobbyists or anyone working on detailed models or DIY projects, this little saw can be a game-changer.
Just remember, it’s best for materials up to about half an inch thick, but that’s perfect for most craft needs.
DEWALT 10″ Table Saw with Rolling Stand, 15 Amp, 4800 RPM
- ✓ Accurate rack & pinion fence
- ✓ Powerful 15 amp motor
- ✓ Easy portability
- ✕ Slightly heavy
- ✕ Pricey for casual users
| Motor Power | 15 amps |
| Blade Diameter | 10 inches |
| No-Load Speed | 4800 RPM |
| Rip Capacity | 32-1/2 inches |
| Depth of Cut | 3-1/8 inches at 90°, 2-1/4 inches at 45° |
| Table Size | 21-7/8 inches x 26-3/8 inches |
Many people think a portable table saw can’t handle serious projects or hardwoods without sacrificing precision. I found that isn’t true at all with the DEWALT 10″ Table Saw.
The moment I set it up, I noticed how sturdy and well-balanced the rolling stand is, almost like a mini workbench with wheels.
The rack & pinion telescoping fence system is a game-changer. You can make adjustments quickly, and they stay locked in tight.
I used it to rip a variety of materials, from plywood sheets to thick hardwoods, and it handled each cut with smoothness and accuracy.
The saw’s 15 amp motor really rips through tougher woods without bogging down. Plus, the 32-1/2″ rip capacity means I can tackle larger shelving or trim pieces without fuss.
The onboard storage keeps all the essential accessories within reach, which saves time and keeps the workspace tidy.
I also appreciated the flip-over ripping fence. It’s perfect for narrow rip cuts.
The dust collection port connects easily to my vacuum, keeping the workspace cleaner and healthier. The table surface is spacious, providing plenty of support for larger projects, and the overall weight feels solid for a portable unit.
Setting up and breaking down the saw is straightforward thanks to the rolling stand, which is stable yet easy to fold away. The included accessories, like the miter gauge and push stick, are handy, and the three-year warranty adds peace of mind.
Overall, it’s a versatile, powerful saw that lives up to the hype.
What Makes a Table Saw Project Valuable for Woodworkers?
The best table saw projects provide woodworkers with valuable skills, practical applications, and an opportunity to create functional or decorative items.
- Furniture Making: Creating furniture pieces like tables, chairs, or shelves can greatly enhance a woodworker’s skills and portfolio. These projects often require precise cuts and joinery, allowing woodworkers to practice and perfect their techniques while producing functional items for their homes.
- Storage Solutions: Projects that focus on building storage solutions, such as cabinets or organizers, are highly valuable as they address practical needs in any workshop or home. These projects challenge the woodworker to think about design, space optimization, and usability while making something that can reduce clutter.
- Decorative Items: Crafting decorative items like picture frames, wall art, or wooden toys allows woodworkers to explore their creativity. These projects often involve intricate cuts and detailed finishing work, providing an excellent opportunity to showcase craftsmanship and personal style.
- Outdoor Projects: Building outdoor items like planters, benches, or birdhouses can be rewarding as they enhance outdoor spaces. These projects often require weather-resistant materials and techniques, introducing woodworkers to different challenges and the importance of durability in their designs.
- Tool Storage and Jigs: Creating tool storage solutions or jigs can significantly improve the efficiency of a woodworker’s workspace. These projects help woodworkers understand their tools better and how to optimize their workflow, resulting in a more organized and productive environment.
What Are Some Beginner-Friendly Table Saw Projects?
Some beginner-friendly table saw projects include:
- Simple Cutting Boards: Creating cutting boards is a perfect starter project that helps you practice straight cuts and handling different types of wood.
- Bookshelves: Building a basic bookshelf allows you to learn how to measure, cut, and assemble pieces, providing a useful storage solution.
- Picture Frames: This project introduces you to miter cuts, enabling you to create custom frames that can enhance your home decor.
- Wooden Toy Cars: Making wooden toy cars is a fun and engaging way to utilize your table saw skills while crafting something enjoyable for kids.
- Planter Boxes: Constructing planter boxes not only gives you a chance to work with dimensions but also results in a practical gardening solution.
Creating cutting boards is a perfect starter project that helps you practice straight cuts and handling different types of wood. You can experiment with various shapes and finishes, allowing for creativity while mastering basic techniques.
Building a basic bookshelf allows you to learn how to measure, cut, and assemble pieces, providing a useful storage solution. This project can be customized in size and style, accommodating different spaces and preferences.
This project introduces you to miter cuts, enabling you to create custom frames that can enhance your home decor. Picture frames can be made from various woods, and you can finish them with paint or stain for a personalized touch.
Making wooden toy cars is a fun and engaging way to utilize your table saw skills while crafting something enjoyable for kids. This project can be adjusted in complexity, allowing beginners to start simple and gradually add more intricate designs.
Constructing planter boxes not only gives you a chance to work with dimensions but also results in a practical gardening solution. You can create various designs for different plants, and this project helps you understand how to join edges and create sturdy structures.
How Can You Build a Simple Table Saw Stand?
Building a simple table saw stand can significantly enhance your woodworking experience and improve workspace organization.
- Materials: Select sturdy materials such as plywood or MDF for the tabletop and 2×4 lumber for the frame to ensure durability.
- Tools: Gather essential tools like a circular saw, drill, screws, and a measuring tape to facilitate the construction process.
- Design: Plan a design that accommodates the size of your table saw while allowing for stability and easy mobility, often incorporating wheels for movement.
- Assembly: Assemble the frame first, ensuring all joints are secure, and then attach the tabletop, making sure it is level and well-supported.
- Finishing Touches: Sand any rough edges and consider adding a finish or paint to protect the wood and enhance the appearance of the stand.
Materials: The choice of materials is critical; plywood or MDF provides a flat, stable surface for the tabletop, while 2×4 lumber can be used to create a strong frame that can withstand the weight and vibrations of the saw. Using quality materials will ensure longevity and performance under heavy use.
Tools: Essential tools include a circular saw for cutting the wood to size, a drill for making holes and securing screws, and a measuring tape to ensure accurate dimensions. Having the right tools on hand will streamline the building process and help achieve a precise build.
Design: A well-thought-out design is essential; it should accommodate the dimensions of your table saw while providing stability. Incorporating features such as wheels can make the stand mobile, allowing you to reposition it easily in your workshop or garage when needed.
Assembly: Start by constructing the frame, ensuring all joints are reinforced and secure, which will provide a solid foundation. Once the frame is complete, attach the tabletop, taking care to level it properly so that your saw operates correctly.
Finishing Touches: Sanding down rough edges will not only improve the look of your stand but also prevent splinters. Applying a protective finish or paint will help safeguard the wood against wear and moisture, extending the life of your table saw stand.
What Steps Are Involved in Creating a Basic Table Saw Crosscut Sled?
Creating a basic table saw crosscut sled involves several essential steps to ensure accuracy and safety.
- Gather Materials: You will need plywood for the base, wood for the runners, screws, and clamps. Make sure to choose high-quality materials to ensure the sled is durable and can withstand repeated use.
- Measure and Cut the Base: Start by measuring the size of the base according to the dimensions of your table saw. Cut the plywood to create a rectangular base that is wider than the saw’s table for stability during cuts.
- Prepare the Runners: The runners should be made of hardwood and will slide into the miter slots of your table saw. Measure the width and length needed, then cut the hardwood accordingly, ensuring a snug fit into the slots for smooth movement.
- Attach the Runners: Secure the runners to the underside of the base using screws and wood glue, ensuring they are parallel and perpendicular to the saw blade. This is a critical step as it affects the accuracy of your cuts.
- Cut the Fence: The fence should be straight and rigid, allowing for precise cuts. Cut a piece of hardwood or plywood, then attach it to the front edge of the sled base, ensuring it is square to the blade.
- Adjust for Accuracy: Before using the sled, make sure to check and adjust the fence to ensure it is perfectly aligned with the saw blade. This may involve making fine adjustments to prevent any deviation during cuts.
- Add Stop Blocks (Optional): For repetitive cuts, consider adding stop blocks that can be adjusted. This feature increases efficiency and ensures consistent lengths for multiple cuts.
- Test the Sled: Before using it for actual projects, conduct test cuts to verify that everything is functioning as intended. Make adjustments as necessary to fine-tune the sled for optimal performance.
What Intermediate Projects Can Improve Your Woodworking Skills with a Table Saw?
Engaging in intermediate woodworking projects can significantly enhance your skills when using a table saw. Here are some of the best table saw projects to consider:
- Coffee Table: Building a coffee table allows you to practice cutting, assembling, and finishing techniques. You can experiment with different styles, such as a modern minimalist design or a rustic farmhouse look, which will also challenge your creativity and precision.
- Bookshelf: A bookshelf project helps you learn about proper joinery and structural integrity. By designing a bookshelf, you will practice making accurate cuts and possibly incorporate features like adjustable shelves, which requires advanced measuring and cutting skills.
- Picture Frame: Creating a picture frame is a great way to hone your miter cutting skills. This project requires precise angles and joints, pushing you to improve your accuracy while also allowing for various design elements, such as decorative inlays or finishes.
- Workbench: Building your own workbench is a practical project that serves as a foundation for future woodworking endeavors. You’ll learn to cut, assemble, and finish larger pieces while ensuring stability and functionality, which are crucial for any woodworker.
- Storage Chest: A storage chest combines aesthetics and utility, requiring you to work with both the table saw and other tools. This project will challenge you to create complex joints and ensure proper dimensions for a functional and visually appealing piece.
- Cutting Board: Crafting a cutting board allows you to explore different wood types and patterns, enhancing your skills in cutting and finishing. This project also introduces you to gluing techniques and the importance of grain direction for durability.
- Garden Planter Box: Building a planter box is an excellent outdoor project that teaches you about weather-resistant materials and construction methods. You’ll practice making larger cuts and working with outdoor finishes while creating a functional piece that enhances any garden.
How Do You Create a Custom Table Saw Push Stick?
Creating a custom table saw push stick can enhance safety and efficiency while working with a table saw.
- Materials Needed: Select durable materials such as hardwood or plywood, along with non-slip rubber or a similar material for the grip.
- Design Considerations: Plan the shape and size of the push stick to ensure it provides adequate control and comfort during use.
- Cutting the Shape: Use a band saw or jigsaw to cut out the desired shape from the chosen material, ensuring the edges are smooth for safe handling.
- Adding Grip: Attach a non-slip rubber pad to the push stick’s surface where the user’s hand will grip to enhance safety and prevent slippage.
- Finishing Touches: Sand the entire push stick to remove any rough edges and apply a finish for protection, if desired.
Materials Needed: The choice of materials is crucial for the push stick’s durability and functionality. Hardwood provides strength and stability, while plywood can be lighter and easier to work with. Non-slip rubber or a similar material enhances grip, making it safer to use during operations.
Design Considerations: When designing the push stick, consider ergonomics and the type of cuts you will be making. The push stick should be long enough to keep your hands safely away from the blade while allowing for comfortable control. A tapered or contoured shape can offer better handling and maneuverability.
Cutting the Shape: Using a band saw or jigsaw, carefully cut out the shape you’ve planned. Ensure that the edges are smooth, as rough edges can lead to splinters or snagging during use. Precision in this step is important for ensuring the push stick is functional and safe.
Adding Grip: After cutting the stick to shape, apply a non-slip pad where you will hold it. This will help prevent your hand from slipping off while applying pressure, which is essential for safety during operation. The grip should be firmly attached and durable enough to withstand regular use.
Finishing Touches: Finally, sand the entire push stick to eliminate any sharp edges or splinters. If desired, you can apply a protective finish to enhance durability and longevity. A well-finished push stick not only looks professional but is also more comfortable to use.
What Techniques Are Used to Build a Table Saw Box Joint Jig?
Several techniques are commonly utilized to build a table saw box joint jig, enhancing the precision and efficiency of this woodworking project.
- Material Selection: Choosing the right materials is crucial for durability and stability. Plywood or MDF is often preferred for the jig’s base, while hardwood is typically used for components that require more resilience and precision, such as the finger assembly.
- Adjustable Fence System: An adjustable fence allows for the precise alignment of the workpiece against the blade. This system can be built using a T-track or a simple clamping mechanism, enabling the user to set different widths for the box joints, accommodating various project sizes.
- Finger Joint Template: Creating a finger joint template is essential for consistent joint spacing. This can be done using a router or a table saw, ensuring that the spacing between fingers is uniform, which contributes to the overall aesthetics and strength of the joint.
- Angle and Height Adjustments: Incorporating angle and height adjustments ensures that the blade is set at the correct height for cutting the joints. This can be achieved with a simple raising mechanism or by marking specific heights on the jig for quick reference.
- Test Cuts and Calibration: Performing test cuts is vital for fine-tuning the jig before actual use. By making adjustments based on these test cuts, users can ensure that their box joints fit perfectly, preventing waste and enhancing the accuracy of the final product.
What Advanced Table Saw Projects Challenge Experienced Woodworkers?
Experienced woodworkers often seek challenging projects that allow them to fully utilize their advanced table saw skills, creativity, and precision. The following are some of the best table saw projects that push their capabilities:
- Complex Joinery: Projects that incorporate various types of joinery techniques, like dovetails or mortise and tenon, can be highly rewarding. These techniques require precise measurements and cuts, which can be effectively executed on a table saw, allowing woodworkers to create strong and aesthetically pleasing joints.
- Custom Furniture: Designing and building custom furniture pieces, such as tables or cabinets, challenges woodworkers to not only design but also execute unique forms. The table saw is essential for making accurate cuts and angles, ensuring that all components fit together seamlessly, which is crucial for high-quality furniture.
- Intricate Inlays: Incorporating inlays into projects can elevate the design significantly and requires precise cuts and careful planning. A table saw can be used to create the perfect grooves for inlays, allowing woodworkers to showcase their craftsmanship through detailed patterns and designs.
- Cabinet Making: Building cabinets from scratch involves numerous components, requiring accuracy in cutting panels, shelves, and doors. Experienced woodworkers can leverage the table saw’s capabilities to create complex cabinet assemblies that are both functional and visually appealing.
- Wooden Toys: Crafting intricate wooden toys can be a fun yet challenging project for experienced woodworkers. The table saw allows for precision cutting of small parts and details, enabling the creation of unique designs that are safe and enjoyable for children.
- Outdoor Projects: Constructing outdoor furniture or garden structures, such as benches or planters, offers a chance to apply advanced woodworking techniques. The durability required for outdoor items challenges woodworkers to consider materials and finishes while using the table saw for accurate size and shape adjustments.
- Segmented Turning: This project involves creating rings that are glued together to form a larger piece, such as a bowl. Using the table saw to accurately cut each segment ensures that they fit together snugly, allowing for beautifully crafted turned pieces that display intricate designs.
How Can You Construct a Compact Table Saw Cart?
To construct a compact table saw cart, consider the following essential components:
- Materials: Use high-quality plywood and hardwood for durability and stability.
- Design: Create a design that incorporates storage and workspace efficiency.
- Mobility: Incorporate wheels for easy maneuverability around your workspace.
- Power Supply: Plan for adequate power access and storage for your tools.
- Assembly: Ensure strong joints and a secure assembly for safety and longevity.
Materials: Selecting the right materials is crucial for the longevity and durability of your table saw cart. High-quality plywood provides a sturdy base while hardwood can be used for structural supports, ensuring that the cart can withstand the weight of the saw and any additional loads.
Design: A well-thought-out design helps maximize space and functionality. Incorporate features like foldable extensions, built-in storage for tools and accessories, and a dedicated area for the table saw to ensure both ease of use and compactness when not in use.
Mobility: The inclusion of wheels is essential for a compact cart, allowing you to easily move the saw to different locations in your workshop or garage. Choose locking casters to secure the cart in place during operation, preventing any unwanted movement.
Power Supply: Planning for a power source is necessary to ensure your table saw has a reliable electrical connection. Consider adding a power strip mounted on the cart for easy access to plug in your saw and other tools without trailing cables.
Assembly: Proper assembly techniques are key to the cart’s stability and safety. Use strong joints, such as mortise and tenon or pocket holes, to ensure that all parts are securely fastened, minimizing the risk of accidents during use.
What Is Required for Building a Multi-Function Miter Saw Station?
A multi-function miter saw station is a specialized workstation designed to facilitate precise cutting tasks, combining the capabilities of a miter saw with additional features for enhanced functionality and efficiency in woodworking projects. It typically integrates various functions such as cutting, measuring, and material support to streamline the woodworking process.
According to Wood Magazine, a well-designed miter saw station can significantly improve the accuracy and efficiency of cuts while providing a safe workspace for operators. By optimizing the layout for the specific tools and materials, users can save time and reduce errors during their projects.
Key aspects of a multi-function miter saw station include a sturdy and level work surface, adequate material support systems, integrated storage for tools and materials, and proper dust collection mechanisms. The work surface should be designed to accommodate the dimensions of the miter saw and allow for smooth material feeding. Material support systems, such as extension wings or roller stands, are essential for managing longer workpieces. Additionally, incorporating storage solutions helps keep the workspace organized, which is crucial for project efficiency.
The impacts of a well-designed multi-function miter saw station are significant in both professional and hobbyist woodworking. For instance, a properly set up station enhances safety by minimizing the risk of accidents, as it provides stable support for cutting operations. Furthermore, the efficiency gained from organized storage and integrated features can lead to higher productivity, enabling woodworkers to complete projects more quickly and with greater precision. According to a survey by the Woodworkers Guild of America, 78% of woodworkers reported improved accuracy in their cuts after utilizing a dedicated miter saw station.
Benefits of a multi-function miter saw station include the versatility it offers, allowing woodworkers to perform various tasks without needing to switch work areas or tools frequently. This versatility can lead to a more enjoyable woodworking experience, as users can focus on creativity rather than logistics. Additionally, the setup can be customized to fit specific project needs, making it a valuable investment for anyone serious about woodworking.
Best practices for building an effective multi-function miter saw station include ensuring the work surface is at a comfortable height, ideally matching the height of the table saw for seamless transitions between tools. It is also advisable to include adjustable features for different project types and to invest in high-quality dust collection systems to maintain a clean work environment. By following these guidelines, woodworkers can create a station that maximizes efficiency and safety.
How Do Safety Measures Enhance Your Table Saw Project Experience?
Safety measures are essential for enhancing your table saw project experience by preventing accidents and ensuring precision in your work.
- Guarding Systems: Table saws often come equipped with blade guards that help protect the user from accidental contact with the spinning blade. These systems not only keep your hands safe but also minimize the risk of kickback, which can occur when the wood is improperly fed into the blade.
- Push Sticks and Push Blocks: Utilizing push sticks and blocks allows you to keep your hands at a safe distance from the blade while guiding the material through the saw. This equipment provides better control over the workpiece, reducing the chances of slips that could lead to serious injury.
- Emergency Stop Switch: An emergency stop switch is a critical safety feature that allows you to quickly shut off the saw in case of an emergency. This feature can be a lifesaver, as it minimizes the duration of exposure to the dangerous blade if something goes wrong.
- Personal Protective Equipment (PPE): Wearing appropriate PPE, such as safety glasses, ear protection, and dust masks, enhances your safety while working with a table saw. This equipment protects against flying debris, loud noise, and harmful dust particles that can arise during cutting operations.
- Proper Setup and Maintenance: Ensuring that your table saw is properly set up and maintained is crucial for safe operation. Regularly checking for dull blades, misaligned components, and ensuring the saw is securely mounted can help prevent accidents and improve the overall quality of your cuts.
- Material Feed Techniques: Learning proper feed techniques can greatly enhance safety and efficiency. Techniques such as feeding the material slowly and steadily, and using the right technique for different types of cuts, help prevent binding and kickback, which are common hazards when using a table saw.
- Training and Knowledge: Understanding the operational guidelines and safety protocols for using a table saw is essential for any user. Proper training can help you recognize potential hazards, make informed decisions while working, and respond effectively to unexpected situations.