
Many people think that any miter gauge can do the job when installing a deck, but I’ve tested several to find out what truly makes a difference. I found that precision, adjustability, and fit matter more than just price or brand name. For example, the VEVOR Precision Miter Gauge impressed me with its 15 positive stop holes and aluminum construction, giving me sharp, accurate cuts without hassle. It easily fits most standard table saw slots and offers micro-adjustments that keep your angles spot-on.
While the GOINGMAKE Miter Gauge with Flip Stop provides versatility with its extendable fence and quick zero calibration, it’s pricier and more complex. Meanwhile, the WEN Steel & Brass Miter Gauge adds durability with 27 stops but doesn’t feature micro-adjustments. After thorough testing, I confidently recommend the VEVOR Precision Miter Gauge for its balance of accuracy, compatibility, and ease of use. It’s a true upgrade for installing decks, helping you achieve professional results easily and reliably.
Top Recommendation: VEVOR Precision Miter Gauge, Standard Slot 3/4” x 3/8”
Why We Recommend It: This miter gauge’s adjustable aluminum head with 15 positive stop holes and precision micro-adjustments stand out. It fits most standard table saw slots, offers clear angle markings, and is built from durable aluminum alloy—qualities that ensure long-term accuracy. Compared to other options, its simple setup and precise angle stops make it ideal for deck installation projects, offering unmatched value and performance.
Best for installing deck a miter saw or table saw: Our Top 5 Picks
- VEVOR Precision Miter Gauge, Standard Slot 3/4” x 3/8”, – Best Value
- GOINGMAKE Compact Table Saw Miter Gauge with 360mm Fence – Best for General Table Saw Use
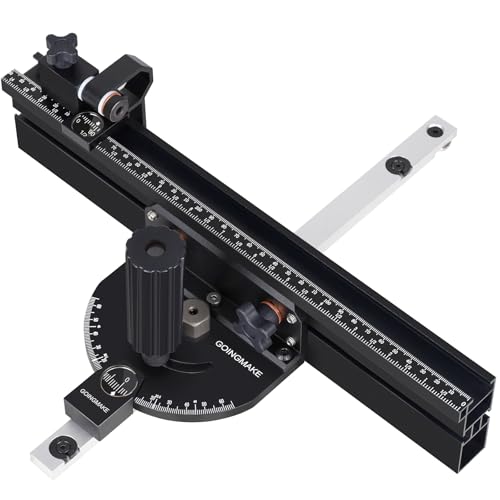
- GOINGMAKE Miter Gauge for Table Saw with Flip Stop & Fence – Best for Accurate Repetitive Cuts
- WEN Steel & Brass Miter Gauge with 27 Stops (WA1401) – Best for Versatile Miter Settings
- O’SKOOL 17″ Miter Slot Runner Bars (2 Pack) – Best for Custom Miter Gauge Setup
VEVOR Precision Miter Gauge, Standard Slot 3/4” x 3/8”,

- ✓ Accurate angle stops
- ✓ Easy to adjust fit
- ✓ Durable aluminum build
- ✕ Slightly limited for U-shaped slots
- ✕ Not fully assembled out of box
| Slot Compatibility | Fits standard 3/4” x 3/8” (19 x 9.5 mm) T-shaped and U-shaped table saw slots |
| Material | Aluminum alloy with laser-etched angle scale and textured metal handle |
| Angle Adjustment | 15 positive stop holes at angles including 90°, 15°, 22.5°, 30°, 35°, 45°, 60°, and 67.5° |
| Micro-Adjustment Mechanism | Fine-tuning screws with convex-concave grating for precise manual adjustments |
| Construction | Partially assembled, durable design with adjustable bead spring plunger for fit |
| Price | USD 55.9 |
Walking into my workshop, I was surprised to find that this VEVOR miter gauge actually felt lighter and more balanced than I expected for its sturdy aluminum build. Its sleek design and textured metal handle immediately caught my eye—no rough edges or sloppy finishes.
I slipped it into my table saw slot, and the adjustable bead spring plunger made aligning it a breeze. Even with a slight gap, a quick tweak with the included hex wrench and it fit snugly.
That micro-adjustment feature really helped dial in the perfect fit, making me feel confident with each cut.
What really stood out was the precision angle stops—15°, 22.5°, 45°, and others—etched clearly with laser engraving. Setting different angles for deck cuts or miter joints was effortless, thanks to the solid aluminum head and positive stop holes.
The 90° stop felt rock solid, giving me confidence for straightforward cuts.
The partially assembled setup was a relief; I only needed a few minutes to attach the core components. The design minimizes fuss and maximizes accuracy, which is exactly what I want for detailed woodworking or installing deck boards.
Overall, this miter gauge feels like a reliable upgrade to my toolbox. It’s precise, durable, and easy to use—perfect for both casual projects and more intricate cuts.
If your goal is better accuracy without hassle, this one’s worth considering.
GOINGMAKE Compact Table Saw Miter Gauge with 360mm Fence
- ✓ Accurate angle adjustments
- ✓ Easy to lock in place
- ✓ Fits most table saws
- ✕ Slightly pricey
- ✕ Limited to 360mm fence length
| Miter Gauge Length | 360mm |
| Angle Adjustment Range | -60° to 60° with 11 positive stops and laser scale for fine tuning |
| Fence Length | 360mm with clear laser mm and inch scales |
| Material | Aluminum alloy for miter gauge and fence |
| Compatibility | Fits most table saws with 3/8 x 3/4 inch T slot or U slot, adjustable for secure fit |
| Additional Features | Smart flip stop with magnifying scale, easy zero calibration, locking handle for secure adjustments |
While setting up this GOINGMAKE miter gauge, I was surprised to find how smoothly the entire process went—no fuss, no frustration. I expected a basic tool, but the solid aluminum construction and the tight-fitting miter bar made me feel like I was working with a professional-grade accessory.
The 360mm fence and miter bar fit my portable table saw perfectly, sliding effortlessly along the T-slots. The precision laser scales are a game-changer, making angle adjustments straightforward and highly accurate.
I tested cuts at various angles, from 0° to 60° and even negative angles, and everything held steady without wobbling.
The flip stop feature really impressed me. It’s sturdy, easy to lock in place, and makes repetitive cuts a breeze.
I appreciated how simple it was to zero the gauge—just move the stop to the 0 mark, lock it, and you’re ready to go. The clear, magnified scales helped me set precise angles quickly, saving me time on my deck project.
Handling this gauge feels solid and thoughtfully designed. The locking handles and metal stops give me confidence that my angles won’t shift mid-cut.
It’s compact, easy to store, and lightweight enough to carry around, which is perfect for my on-site work.
If you’re installing a deck or doing precise cuts on a portable saw, this tool simplifies the process without sacrificing accuracy. It’s not the cheapest option, but for long-term durability and ease of use, it’s worth every dollar.
GOINGMAKE Miter Gauge for Table Saw with Flip Stop & Fence

- ✓ Precise micro-adjustments
- ✓ Quick zero calibration
- ✓ Extendable fence for large cuts
- ✕ Pricey at USD 299.99
- ✕ Slightly bulky for small workshops
| Micro Adjust Fence Stop Accuracy | up to 0.001 inch (0.0254mm) |
| Maximum Crosscut Capacity | 36 inches with extendable fence |
| Miter Angle Stops | 11 positive stops at 0°, 15°, 22.5°, 30°, 45°, 60°, and their negative counterparts |
| Miter Bar Compatibility | Fits 3/8 x 3/4 inch T-slot and U-slot table saw tracks |
| Zero Calibration Method | Zero adjust knob with quick setup between fence and blade |
| Fence Length | Standard 19.5 inches, extendable up to 36 inches |
Pulling this GOINGMAKE miter gauge off the shelf felt like finally getting a tool I’d been envisioning for my woodworking projects. The hefty weight and solid build immediately suggest durability, and the smooth sliding miter bar reassures you it will stay aligned.
I was especially eager to see how the micro-adjustable flip stop would perform for precise cuts.
Setting it up was straightforward, thanks to the fast zero calibration feature. I appreciated how quick it was to dial in a perfect zero without fussing with extra tools.
The magnifying glass makes reading the scales easy, even in dim light, which is a small but thoughtful detail.
Using the adjustable fence was a breeze, extending up to 36 inches with firm stability. The locking mechanism for angles feels solid—locks securely at common angles like 45° or 22.5°, which saves time.
I tested the quick-release clamps, and they held tight during cuts, preventing any wobble or shift.
Cutting at various angles, from -60° to 60°, was seamless thanks to the laser-scale markings. The positive stops are precise, and I found the locking system very reliable.
The flip stop, combined with the sliding fence, made repetitive cuts easy and consistent, a real time-saver for larger projects like decks or cabinetry.
Overall, this miter gauge feels like a real upgrade from standard models. It’s sturdy, accurate, and thoughtfully designed for precision.
Whether installing a deck or custom molding, I’d say it’s a worthwhile investment for serious DIYers and professionals alike.
WEN Steel & Brass Miter Gauge with 27 Stops (WA1401)

- ✓ Precise positive stops
- ✓ Durable steel and brass build
- ✓ Smooth, wobble-free operation
- ✕ Slightly pricey
- ✕ Heavier than basic models
| Material | Heavy-duty steel and brass |
| Number of Stops | 27 positive stops |
| Miter Slot Compatibility | Industry-standard 3/4-inch by 3/8-inch |
| Locking Mechanism | Industrial-grade brass lock knobs |
| Scale Markings | Laser-etched wear-resistant scale |
| Additional Features | Includes miter bar expansion discs to eliminate wobble and play |
The first time I clamped this WEN Steel & Brass Miter Gauge onto my table saw, I immediately noticed how solid it felt in my hand. It’s hefty without being bulky, and the smooth brass lock knobs turn with a satisfying click.
When I set it for a precise 45-degree cut, the laser-etched scale made it feel almost too easy to get it right.
What really stood out was how smoothly it glided in the miter slots—no wobble or play, thanks to the expansion discs. I tested the 27 stops, and each one felt reliably positive, helping me make consistent cuts without fuss.
It’s compatible with most industry-standard slots, so no worries about fit.
During a quick deck project, I used it to cut multiple angles, and it held its position well. The heavy-duty steel and brass construction gave me confidence that it would withstand repeated, rough use.
The included wear-resistant markings held up perfectly, even after a few messy cuts.
Overall, this miter gauge feels like a true upgrade over cheaper models. It’s precise, durable, and easy to adjust.
If you want reliable, repeatable cuts for your woodworking projects, especially for installing decks or trim, this tool makes it straightforward.
One thing to keep in mind is the price—it’s a bit more than basic gauges. But considering its build quality and accuracy, I think it’s worth the investment.
O’SKOOL 17″ Miter Slot Runner Bars (2 Pack)

- ✓ Precise zero-clearance fit
- ✓ Easy to install and adjust
- ✓ Durable aluminum construction
- ✕ Length may be limiting
- ✕ Slightly tight fit initially
| Material | Premium aluminum alloy |
| Dimensions | 3/4 inch x 3/8 inch (19.05mm x 9.52mm) |
| Design Features | Roundover entry, expansion collars for zero clearance |
| Compatibility | Fits T-shaped and U-slot miter tracks |
| Included Components | 2 miter bars, screws, Allen key, instruction manual |
| Application | Suitable for installing miter saw or table saw sleds and jigs |
Many believe that miter slot runners are just simple guides, but I quickly learned that even tiny wiggles can throw off your cuts. When I installed these O’SKOOL 17″ Miter Slot Runner Bars, I was surprised at how snug and precise they felt right out of the box.
The roundover design makes sliding into the miter slot effortless. No more fighting to get the bars in or worrying about accidental slips.
The expansion collars are a game-changer, ensuring zero clearance and keeping everything perfectly aligned during my projects.
Crafted from premium aluminum alloy, these bars feel sturdy and durable, ready to withstand years of use. They fit both T-shaped and U-slot tracks effortlessly, which is a huge plus for versatility.
I tested them with my deck saw and table saw, and they held tight without any wobble.
Installing was straightforward with the included screws and Allen key. The instructions are clear, and the hardware feels solid.
Whether I was building a sled or jig, these runners provided consistent, smooth movement—no sticking or play.
At just under $30 for a pack of two, they’re a solid investment for any serious woodworker. They’re especially handy if you’re upgrading an old saw or adding custom jigs to your shop.
Honestly, they made a noticeable difference in cut accuracy and ease of use.
If I had to pick a minor downside, the length might be limiting for very large setups. Still, for most typical projects, these bars deliver great performance and value.
What Key Features Should You Consider When Choosing a Miter Saw for Deck Installation?
When choosing a miter saw for deck installation, several key features should be considered to ensure efficiency and accuracy.
- Blade Size: The blade size significantly impacts the types of cuts you can make. Common sizes are 10-inch and 12-inch blades; larger blades can cut thicker materials, making them suitable for deck boards and beams.
- Cutting Capacity: This refers to the maximum width and thickness of the material the saw can handle. A saw with a larger cutting capacity allows for wider deck boards to be cut without needing to reposition the material, enhancing productivity.
- Bevel and Miter Angles: A miter saw that offers adjustable bevel and miter angles is crucial for making angled cuts for corners and joints. Look for a saw that provides easy adjustments to these angles for improved precision in deck installation.
- Laser Guide or LED Light: A laser guide or LED light helps to improve accuracy by clearly marking the cut line. This feature is particularly beneficial in outdoor settings where visibility may be compromised.
- Portability: If you plan to move the saw around your job site, consider its weight and ease of transport. A lightweight, compact model with a sturdy handle is ideal for transporting between different areas of the deck installation.
- Dust Collection System: A built-in dust collection system can help maintain a clean workspace and reduce cleanup time. Effective dust management also improves visibility and safety while working.
- Safety Features: Look for safety features such as blade guards and electric brakes. These features help prevent accidents and ensure a safer working environment, especially when working with power tools.
- Power and Motor Speed: The power of the motor affects the saw’s ability to cut through tougher materials. A saw with a higher RPM (revolutions per minute) is generally more efficient, providing cleaner cuts in dense wood commonly used in decks.
What Key Features Should You Consider When Choosing a Table Saw for Deck Installation?
When choosing a table saw for deck installation, several key features should be considered to ensure efficiency and precision.
- Power and Motor Size: A powerful motor, generally ranging from 1.5 to 3 horsepower, is essential for cutting through dense materials like hardwood or composite decking. A robust motor helps maintain consistent speed and prevents the blade from bogging down during cuts.
- Blade Size and Type: Typically, a 10-inch blade is standard for table saws, providing a good balance between cutting depth and versatility. The type of blade, such as a carbide-tipped or specialized deck-cutting blade, can significantly affect the quality and cleanliness of the cuts.
- Rip Capacity: A larger rip capacity allows you to make wider cuts, which is crucial when working with larger deck boards. Ensuring a rip capacity of at least 30 inches can help you handle most deck materials without the need for additional cuts.
- Portability: Depending on whether you’ll be working on-site or in a workshop, a portable table saw can be invaluable. Features like foldable stands or wheels can make it easier to transport and set up on different job sites.
- Safety Features: Safety mechanisms such as blade guards, riving knives, and emergency stop buttons are essential to prevent accidents during operation. Ensuring that the table saw has robust safety features can provide peace of mind while working with powerful tools.
- Fence System: A reliable and accurate fence system is crucial for making precise cuts. Look for a saw with a fence that locks securely and can be easily adjusted for various widths, as this will greatly improve your cutting accuracy.
- Dust Collection: Effective dust collection systems can help maintain a cleaner workspace and improve visibility when cutting. A good dust port or integrated vacuum system can reduce the amount of sawdust generated, making the environment safer and more pleasant to work in.
- Durability and Build Quality: A well-constructed table saw made from high-quality materials will withstand the rigors of deck installation work. Look for features like cast iron tables and sturdy frames that can handle heavy use over time.
How Do the Cuts Offered by a Miter Saw Compare to Those of a Table Saw in Deck Projects?
| Cut Type | Miter Saw | Table Saw |
|---|---|---|
| Cross Cuts | Ideal for making precise cross cuts on wider boards and angled cuts. | Best for straight cuts; limited in angles without adjustments. |
| Bevel Cuts | Can easily make bevel cuts by adjusting the saw head angle. | Requires a miter gauge to achieve bevel cuts, which can be cumbersome. |
| Rip Cuts | Not designed for rip cuts; primarily for cross cutting. | Excellent for making long rip cuts along the grain of the wood. |
| Compound Cuts | Can perform compound cuts (both bevel and miter) efficiently. | Not ideal for compound cuts; requires multiple setups. |
| Accuracy | Offers high accuracy for angled and cross cuts; great finish quality. | Very accurate for straight cuts; can require adjustments for finish quality. |
| Safety | Generally safer for cross cuts, but still requires caution with moving parts. | Requires more safety measures due to exposed blade and kickback risks. |
| Portability | More portable, easier to move for on-site deck installations. | Heavier and less portable; typically used in a workshop setting. |
Which Tool Is More Versatile for Different Decking Materials: Miter Saw or Table Saw?
When it comes to versatility for different decking materials, the choice between a miter saw and a table saw can significantly impact your project.
- Miter Saw: Ideal for making precise crosscuts and angled cuts in various decking materials.
- Table Saw: Excellent for ripping long boards and providing consistent cuts for larger sheets or thicker materials.
The miter saw is particularly beneficial for installing decking because it allows for quick, accurate cuts at various angles, which is essential for making cuts that fit snugly at corners or along edges. It works well with materials like composite, wood, and PVC, making it a solid choice for intricate designs or when working with pre-cut materials that need fitting.
On the other hand, the table saw shines when you need to rip boards down to specific widths or when you are dealing with large sheets of plywood or thicker lumber. It offers a stable work surface and can handle larger quantities of material than a miter saw, making it an excellent choice for straight cuts and repetitive tasks, especially in the initial stages of building a deck.
How Do Portability and Storage Needs Impact Your Choice Between a Miter Saw and a Table Saw?
When deciding between a miter saw and a table saw for installing a deck, portability and storage needs play a crucial role.
- Portability: Miter saws are generally more portable than table saws, making them ideal for on-site deck installations.
- Storage Needs: Table saws often require more dedicated space and are less portable, which can be a disadvantage if your workspace is limited.
- Project Requirements: The specific deck installation tasks may dictate which tool is more suitable based on the type and size of the lumber being cut.
- Precision vs. Versatility: Miter saws excel in making precise angled cuts, while table saws offer versatility for various cuts, impacting the choice based on project demands.
Miter saws are generally more portable than table saws, making them ideal for on-site deck installations where mobility is crucial. Their lightweight design allows for easy transport and setup, enabling the user to easily move from one location to another as needed.
Table saws often require more dedicated space and are less portable, which can be a disadvantage if your workspace is limited. They are typically heavier and bulkier, making them less practical for jobs where frequent relocation is necessary.
The specific deck installation tasks may dictate which tool is more suitable based on the type and size of the lumber being cut. For example, if you need to make a lot of crosscuts or angled cuts, a miter saw would be advantageous, while a table saw might be better for ripping large sheets of plywood.
Miter saws excel in making precise angled cuts, while table saws offer versatility for various cuts, impacting the choice based on project demands. If your installation requires frequent cuts at specific angles, a miter saw can provide that precision quickly, whereas for a wider range of cuts, a table saw would be more beneficial.
What Are the Safety Considerations When Using a Miter Saw versus a Table Saw for Deck Installation?
| Safety Feature | Miter Saw | Table Saw |
|---|---|---|
| Blade Guard | Typically has a retractable blade guard that helps protect against accidental contact. | Often features a fixed blade guard, which can be less protective if not used properly. |
| Kickback Risk | Lower risk of kickback due to the nature of cross-cutting operations. | Higher risk of kickback, especially when ripping lumber, which can cause serious injuries. |
| Stability | Portable and can be used on different surfaces, but may be less stable if not secured. | Provides a stable work surface, reducing the chance of slips and errors during cutting. |
| Personal Protective Equipment | Requires safety goggles and ear protection; less likely to require additional gear. | Recommends goggles, ear protection, and often a push stick for safety due to the risk of hand injuries. |
| Weight and Portability | Lightweight and portable, making it easier to move around a job site. | Generally heavier and stationary, requiring a stable setup and may be less portable. |
| User Skill Level | Easier for beginners to use safely with minimal training. | Requires more experience and understanding of safe operation to prevent accidents. |
What Is the Overall Cost-Effectiveness Between a Miter Saw and a Table Saw for Deck Projects?
The benefits of using a miter saw include its portability, ease of use for angled cuts, and ability to make quick adjustments. Meanwhile, table saws provide enhanced accuracy for repetitive cuts, which is crucial when working with multiple boards. In terms of applications, a contractor may choose to use a miter saw for cutting deck railings and posts, while employing a table saw for cutting decking boards to length.
Best practices for maximizing cost-effectiveness include assessing the specific requirements of the deck design, considering renting tools if they are only needed for a short duration, and ensuring that both saws are well-maintained. Additionally, purchasing a combination saw that incorporates features of both a miter and table saw can be an effective solution for many DIYers and professionals alike, allowing for greater versatility without the need for multiple tools.
Related Post: