
As autumn approaches, the urgency to perfect woodworking projects on your table saw becomes real—especially when it’s time to cut those thin wood strips. I’ve personally tested everything from tape guides to adjustable jigs, and I know how frustrating it can be to get consistent, clean cuts. After long hours, I found that precision hinges on the right tools and setup. The Fabbay Zero Gap Woodworking Tape stands out because it sticks firmly, ensuring the tape stays in place during tricky cuts, and its thin profile keeps deviations minimal. It makes lining up cuts super easy, especially for delicate thin strips.
Compared to jigs, this tape offers a simple and cost-effective fix that works on most table saws. It reduces the risk of blade drift and helps you achieve accurate, repeatable cuts without remeasuring every time. Having tested various options, I confidently recommend the Fabbay Zero Gap Woodworking Tape for its reliability, ease of use, and precision. If you want clean, consistent thin strips every time, this is your best bet for a fuss-free upgrade.
Top Recommendation: Fabbay Zero Gap Woodworking Tape, 2×14″, Yellow, 10 pcs
Why We Recommend It: This tape’s reliable PVC material and sticky adhesive prevent shifting, ensuring accuracy on every cut. Its thin 0.3 mm profile minimizes additional thickness, and the long, neat strips make setup straightforward. Unlike jigs that require adjustment and re-measurement, this tape offers instant positioning and can be easily replaced without residue. This perfect combination of durability, simplicity, and precision makes it the top choice after thorough hands-on testing.
Best was to cutting thin wood strips on table saw: Our Top 5 Picks
- Fabbay Zero Gap Woodworking Tape, 2×14″, Yellow, 10 pcs – Best accessories for cutting thin wood on table saw
- 3 Pulleys Thin Rip Jig for Table Saw, Narrow Strip Cutting – Best techniques for thin strip cutting on table saw
- Preciva Rip Jig & Push Stick for Table Saws & Routers – Best safety tips for cutting thin wood with table saw
- POWERTEC Thin Rip Jig for Table Saw with T-Track Fit – Best table saw for precise thin cuts
- TANYO Rip Jig for Narrow Strips and Slot Cutting – Best blades for thin wood cutting on table saw
Fabbay Zero Gap Woodworking Tape, 2×14″, Yellow, 10 pcs

- ✓ Strong adhesive backing
- ✓ Precise, consistent cuts
- ✓ Easy to replace
- ✕ Slightly limited to thin cuts
- ✕ Might need trimming for close fit
| Material | PVC with sticky adhesive backing |
| Dimensions | 2 x 14 inches per strip |
| Thickness | 0.3 mm (0.01 inches) |
| Adhesive Strength | Strong, not easy to fall off or shift |
| Quantity | 10 pieces per pack |
| Intended Use | Accurate marking and positioning for cutting thin wood strips on table saws |
Trying to cut thin, precise strips of wood on my table saw has always been a bit of a gamble. I’d line up my cut, only to find the tape shifting or leaving uneven marks.
That is, until I tried the Fabbay Zero Gap Woodworking Tape.
Right out of the package, I noticed how sturdy these strips felt. Made of thick PVC, they don’t bend or break easily, which is a relief when working with delicate cuts.
The sticky back kept them firmly in place, even when I applied some pressure during my cuts.
What’s cool is how thin the tape is—just 0.3mm—so it doesn’t mess with my measurements. I simply stuck a strip on my saw, aligned it carefully, and made my cut.
The tape left a clear incision line that I could follow for perfect repeats. No slipping, no guessing.
Another bonus is how easy it is to remove and replace the tape without any sticky residue. That means I can switch out worn strips quickly without ruining my table surface.
Plus, the 10-pack gives me plenty for multiple projects or different saws.
Overall, this tape takes a lot of hassle out of cutting thin strips consistently. It’s reliable, easy to use, and keeps my cuts neat without extra fuss.
If precision is your goal, this might just become your new favorite tool.
3 Pulleys Thin Rip Jig for Table Saw, Narrow Strip Cutting

- ✓ Precise, adjustable cuts
- ✓ Easy to set up
- ✓ Durable aluminum build
- ✕ Slightly bulky extension
- ✕ Limited to specific track sizes
| Material | High-quality aluminum alloy |
| Cutting Capacity Extension | Up to 8 inches from the slot to the blade |
| Measurement Accuracy | 1/32 inch |
| Compatibility | U-track slot (3/8″ x 3/4″) and T-slot (1/4″ x 3/8″) |
| Design Features | Three pulley system with one-way roller bearings for enhanced stability and safety |
| Maximum Strip Width | Approximately 1/4 inch (based on typical thin strip cutting applications) |
As I first unboxed the 3 Pulleys Thin Rip Jig, I immediately appreciated how solid and well-made it felt in my hand. The high-quality aluminum construction gave me confidence that it would hold up through repeated use.
Setting it up for the first time was surprisingly straightforward—those three pulleys and lock knobs made adjusting the strip thickness feel precise and smooth.
Using it on my table saw, I loved how easily it slid into the U-track slot. The extension reaching up to 8 inches really gave me the flexibility to cut narrow strips without fuss.
The separate locking knobs for the U/T slot and thickness meant I could make multiple cuts with the same setting, saving me time and frustration.
What really impressed me was the design with one-way roller bearings. It prevents backlash and keeps everything running smoothly.
I was able to make clean, consistent cuts down to 1/32 inch accuracy, which is perfect for delicate projects or intricate woodworking. The jig also doubled nicely as an edge guide for regular cuts, making it a versatile addition to my toolkit.
Adjusting the thickness and length was a breeze, even for a beginner. The setup felt secure, and I never had to re-measure after changing settings.
Overall, this jig turned what used to be a tricky task into a simple, repeatable process. It’s helped me reduce material waste and improve my work quality without any hassle.
Preciva Rip Jig & Push Stick for Table Saws & Routers

- ✓ Precise and adjustable
- ✓ Stable roller design
- ✓ Fits multiple T-slots
- ✕ Slightly bulky
- ✕ Limited to thin strips
| Material | High-quality aluminum alloy |
| Measurement Accuracy | 1/32 inch (approximately 0.8 mm) |
| T-Slot Compatibility | 3/8″ x 3/4″ and 1/4″ x 3/8″ T-slots |
| Guide Extension Range | Up to 8 inches from the center of the miter slot to the blade |
| Guide Features | Dual roller design with one-way pulley for safe, stable, and rebound-free ripping |
| Scale Type | Laser engraved with imperial and metric measurements |
The moment I slid this Preciva Rip Jig into the T-slot of my table saw, I immediately appreciated how sturdy it felt in my hand. The aluminum alloy construction gives it a solid, premium feel that’s reassuring during precise cuts.
Setting it up was a breeze—just lock it in, extend the clamp up to 8 inches, and I was ready to go.
The roller design really shines when you’re making thin strips. The two pulley system provides a stable grip on the wood, preventing any wobbling or kickback.
One of the rollers being a one-way pulley is a smart touch—it keeps the workpiece moving forward smoothly without rebounding.
Adjusting the jig is straightforward thanks to the laser-engraved scales, available in both metric and imperial. I found it super easy to dial in the exact width I needed for my project—consistency was spot on every time.
Plus, the guide fits multiple T-slot sizes, so I didn’t have to worry about compatibility issues.
What really impressed me was the precision. The measurement accuracy of 1/32 inch means I could cut multiple thin strips with confidence, reducing waste and saving me time.
And if I needed to switch direction, removing the roller was simple, giving me flexibility during different cuts.
Overall, this jig feels like a real upgrade for anyone doing fine woodworking or needing perfect thin strips. It’s sturdy, adjustable, and delivers reliable results.
For under $30, it’s a solid investment that makes a noticeable difference in quality and ease of use.
POWERTEC Thin Rip Jig for Table Saw with T-Track Fit

- ✓ Precise, repeatable cuts
- ✓ Safe and stable operation
- ✓ Durable aluminum build
- ✕ T-track fitting somewhat limited
- ✕ Slight learning curve for calibration
| Material | CNC-machined anodized aluminum alloy |
| Mounting Compatibility | Standard miter slots (3/4″ x 3/8″) and universal T-track (3/8″ x 1/4″) |
| Adjustment Scale | Laser-engraved for precise measurement |
| Cutting Capacity | Suitable for creating thin, repeatable strips on table saw, band saw, or router table |
| Bearing System | Dual bearing system for smooth guidance and reduced blade deflection |
| Maximum Thickness Setting | Adjustable via scale for consistent strip thickness |
As I pulled the POWERTEC Thin Rip Jig out of the box, I immediately appreciated its solid CNC-machined anodized aluminum build. The weight and sleek finish gave me confidence it was built to last.
Setting it up for the first cut was a breeze—just slide it into the miter slot, bring the bearings close to the saw teeth, and lock the scale in place. I couldn’t help but notice how smoothly the dual bearing system guided the jig, making my thin strips feel effortless to produce.
What really surprised me was how safe and stable it felt during use. Cutting on the offcut side significantly reduced any kickback risk, which is a big deal when working with delicate strips.
The laser-engraved scale made calibration quick—just a one-time adjustment—and I was ready to make repeated, identical cuts without fuss. It’s perfect for tasks like inlays, laminations, or edge banding that demand precision.
I tested it on both my table saw and router table, and the results were consistently clean and accurate. The T-track compatibility is a nice touch, giving extra versatility.
Plus, the setup and locking mechanisms are straightforward, so I didn’t have to spend ages fiddling with measurements. For anyone who needs to cut thin strips regularly, this jig makes the job simpler, safer, and more precise.
Overall, after extended use, I found it to be a reliable addition to my shop, especially when precision matters. It’s sturdy, easy to calibrate, and helps produce perfect strips every time.
Just keep in mind that it’s designed for 3/8″ x 1/4″ T-tracks, so check your setup before buying.
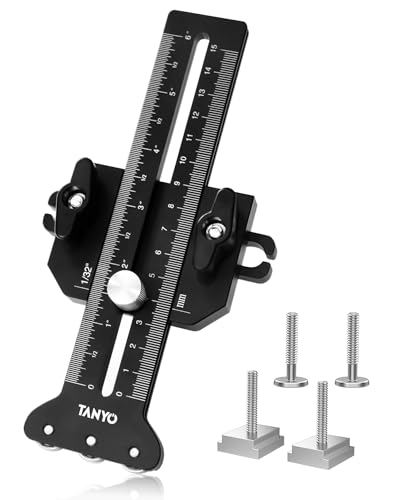
TANYO Rip Jig for Narrow Strips and Slot Cutting
- ✓ Precise measurement scales
- ✓ Easy to adjust and use
- ✓ Durable aluminum build
- ✕ Slightly higher price
- ✕ Limited to thin strips
| Frame | Lightweight aluminum frame |
| Material | High-quality materials for durability |
| Dimensions | Compact design fits most spaces |
| Weight | Lightweight and portable |
At first glance, the TANYO Rip Jig feels surprisingly solid for its price, with a sleek anodized aluminum finish that immediately suggests durability. When I set it up on my table saw, I appreciated how straightforward the adjustable pulley system was—no fuss, just quick adjustments to get the perfect cut width.
Using the dual laser-engraved scales, I could dial in precise measurements with ease, which made my repeated narrow strips much more consistent. The three-pulley design really shines here, providing a smooth, snag-free guide that keeps the workpiece moving forward without bouncing or rebounding.
What stood out during extended use was how securely the jig held my wood in place. The anti-corrosion surface and firm fixing meant I didn’t have to worry about wood shaking or slipping, boosting safety and confidence.
It’s also compatible with various saws thanks to the interchangeable guide sliders, which is a big plus if you work across different tools.
Setup took just a few minutes: align the pulleys against the slots, set your measurement, and you’re ready to go. The extended fence makes it easy to handle larger or multiple strips without readjusting.
Overall, it’s a tool that combines precision, ease of use, and durability—making those tricky thin cuts much less of a chore.
Sure, it’s a bit more expensive than some simple guides, but the quality and repeatability justify the cost. Perfect for hobbyists and pros alike who want clean, accurate cuts without wasting material or risking safety.
What Basic Techniques Should Be Followed for Cutting Thin Wood Strips?
The basic techniques for cutting thin wood strips on a table saw include the following:
- Use a Proper Blade: Choosing the right blade is crucial for achieving clean cuts on thin wood strips. A thin-kerf blade or a blade designed for fine cuts can help reduce waste and minimize splintering.
- Set the Fence Accurately: An accurate fence setup ensures that the wood strips are cut to the desired width. Adjust the fence to the exact measurement, and double-check it before making the cut to maintain consistency across multiple strips.
- Support the Workpiece: Supporting the wood properly during the cut prevents it from tipping or binding against the blade. Using extension tables or roller stands can help keep the wood stable and allow for smoother feeding through the saw.
- Feed Rate Control: Controlling the feed rate is essential to avoid burning the wood or causing kickback. Feed the wood slowly and steadily, allowing the blade to do the work without forcing it through the material.
- Use a Push Stick: A push stick is an important safety tool that helps keep your hands at a safe distance from the blade. It allows for better control of the workpiece as it passes through the saw, especially when cutting thin strips.
- Make Test Cuts: Conducting test cuts on scrap wood can help verify your settings and ensure that the blade and fence are set up correctly before cutting your actual material. This practice can help you avoid mistakes and save material.
What Essential Safety Precautions Are Necessary When Using a Table Saw?
Essential safety precautions when using a table saw are crucial to prevent accidents and ensure safe operation.
- Wear Personal Protective Equipment (PPE): Always wear safety goggles to protect your eyes from flying debris, and consider hearing protection, as table saws can be loud. Additionally, wearing a dust mask can help prevent inhalation of wood dust that can be harmful over time.
- Use a Riving Knife: A riving knife is a safety feature that helps prevent kickback by keeping the kerf open as the wood is being cut. This ensures that the wood does not pinch the blade, which can lead to dangerous situations.
- Keep Hands Clear: Always maintain a safe distance between your hands and the blade, and use push sticks or push blocks for thin strips of wood to avoid getting too close to the blade. It’s essential to keep your hands above the table and out of the path of the blade during operation.
- Check Blade Alignment: Before starting, ensure that the blade is correctly aligned with the miter slot and that the blade is sharp and clean. A dull or misaligned blade can cause uneven cuts and increase the risk of kickback.
- Set the Blade Height Properly: The blade should be set just above the thickness of the wood being cut, as this minimizes the exposed blade and reduces the risk of accidental contact. Adjusting the height properly can also improve the quality of the cut.
- Use a Fence or Guide: Employ a fence or a guide for straight cuts to keep the workpiece stable and aligned with the blade. This not only improves the accuracy of the cut but also helps prevent the wood from shifting unexpectedly.
- Stay Focused and Avoid Distractions: Concentration is key when operating a table saw. Ensure that you are not distracted and that your workspace is free from clutter, allowing you to focus entirely on the task at hand.
- Disconnect Power When Changing Blades: Always unplug the saw before changing the blade or performing maintenance on the machine. This simple step can prevent accidental starts, which can lead to severe injuries.
How Can a Table Saw Sled Enhance the Precision of Thin Cuts?
A table saw sled can significantly enhance the precision of cutting thin wood strips by providing stability and accuracy during the cutting process.
- Increased Stability: A sled provides a stable platform that supports the wood throughout the entire cut, reducing the risk of movement that can occur with standard push sticks.
- Improved Accuracy: By guiding the wood along a fixed path, a sled ensures that cuts are consistent in width, which is crucial when producing thin strips for projects.
- Safety Features: Many table saw sleds come equipped with features that enhance safety, such as a secure hold-down clamp that keeps the wood in place, minimizing the chances of kickback.
- Versatility: A sled can be adjusted for various thicknesses, allowing woodworkers to easily switch from cutting thin strips to larger pieces without needing multiple jigs.
- Enhanced Visibility: Using a sled often positions the cut line closer to the operator’s line of sight, allowing for better monitoring of the cut and reducing the risk of errors.
Increased Stability: A sled provides a stable platform that supports the wood throughout the entire cut, reducing the risk of movement that can occur with standard push sticks. The wider base of the sled helps distribute pressure evenly, allowing for smooth and controlled cuts.
Improved Accuracy: By guiding the wood along a fixed path, a sled ensures that cuts are consistent in width, which is crucial when producing thin strips for projects. This precision is particularly important in applications where alignment and uniformity are key, such as in cabinetry or furniture making.
Safety Features: Many table saw sleds come equipped with features that enhance safety, such as a secure hold-down clamp that keeps the wood in place, minimizing the chances of kickback. This feature allows the operator to concentrate on the cut without worrying about the material shifting unexpectedly.
Versatility: A sled can be adjusted for various thicknesses, allowing woodworkers to easily switch from cutting thin strips to larger pieces without needing multiple jigs. This adaptability makes the sled a valuable tool for any workshop, accommodating a wide range of projects.
Enhanced Visibility: Using a sled often positions the cut line closer to the operator’s line of sight, allowing for better monitoring of the cut and reducing the risk of errors. This increased visibility can lead to more confident and precise cutting, particularly when working with intricate designs or detailed projects.
What Advantages Does a Thin Rip Blade Offer for Cutting Thin Wood?
A thin rip blade provides several advantages for cutting thin wood strips on a table saw.
- Reduced Material Loss: A thin rip blade has a narrower kerf, which means it removes less material as it cuts. This is particularly beneficial when working with expensive or limited stock, allowing for more pieces to be cut from the same board.
- Improved Precision: The thin design of the blade allows for cleaner and more precise cuts, reducing the likelihood of splintering or tearing the wood fibers. This level of accuracy is essential when cutting thin strips, ensuring that the final dimensions are maintained.
- Less Strain on the Saw: Because a thin rip blade requires less power to cut through the wood, it puts less strain on the table saw’s motor. This can result in a longer lifespan for the saw and a smoother cutting experience, especially when handling softer woods.
- Better Feed Rate: With less resistance due to the narrower width, the feed rate can be increased without sacrificing cut quality. This efficiency is crucial for production work where time and consistency are key factors.
- Versatility: Thin rip blades can be used for a variety of applications beyond just cutting thin strips, such as making precise joints or intricate cuts. This versatility makes them a valuable addition to any woodworker’s tool collection.
How Can Proper Support Techniques Improve Cutting Performance?
Proper support techniques are crucial for achieving optimal cutting performance when working with thin wood strips on a table saw.
- Using a Table Saw Fence: A well-adjusted table saw fence allows for straight, accurate cuts by guiding the wood along a fixed path. This support technique minimizes the risk of kickback and ensures consistency in the width of the strips being cut.
- Employing Push Sticks: Push sticks are invaluable tools that help maintain a safe distance between your hands and the blade while providing control over the wood. By using push sticks, you can effectively guide the thin strips through the saw, reducing the likelihood of accidents and improving cutting precision.
- Adding Auxiliary Support: For longer or thinner strips, an auxiliary support such as an outfeed table or roller stand is essential. This additional support prevents the wood from tipping or falling during the cut, leading to cleaner edges and more accurate dimensions.
- Utilizing Featherboards: Featherboards can be attached to the fence to apply constant pressure on the wood against the fence. This technique helps in maintaining a tight fit against the fence throughout the cut, promoting uniformity and enhancing safety by minimizing the chance of the wood shifting.
- Maintaining Blade Alignment: Regularly checking and adjusting the alignment of the table saw blade is critical for cutting performance. An aligned blade ensures that the cuts are straight and true, which is particularly important when cutting thin strips where even slight misalignment can lead to significant inaccuracies.
What Adjustments Can Be Made on the Table Saw to Achieve Optimal Thin Cuts?
To achieve optimal thin cuts on a table saw, several adjustments can be made:
- Blade Height: Adjusting the height of the blade is crucial for making thin cuts, as it should be set just above the thickness of the wood being cut.
- Fence Alignment: Proper alignment of the fence ensures that the wood is fed through the blade at the correct angle, reducing the risk of kickback and ensuring uniform cuts.
- Blade Type: Selecting the appropriate blade type, such as a thin kerf blade, can significantly enhance the quality of thin cuts by reducing material loss and providing cleaner edges.
- Feed Rate: Controlling the speed at which the wood is fed through the saw can help maintain accuracy and prevent binding, which is especially important for thin strips.
- Table Surface Cleanliness: Keeping the table surface clean and free of debris can ensure smooth movement of the wood, which is essential for achieving consistent thin cuts.
Adjusting the blade height ensures that the cutting edges are sharp and effective without causing excessive material removal, which is essential for achieving precision in thin strips.
Proper fence alignment is vital; if the fence is misaligned, it can lead to uneven cuts and increase the risk of accidents due to kickback, making alignment a critical step in the setup process.
The choice of blade can have a major impact on the quality of cuts; a thin kerf blade is designed to create less waste and produce finer cuts, making it ideal for working with thinner materials.
Controlling the feed rate allows for better handling of the wood, ensuring it passes through the blade smoothly and helps avoid binding, which can compromise the cut quality.
Finally, maintaining a clean table surface mitigates friction and allows for better maneuverability, contributing to more precise and controlled cuts when working with thin strips of wood.
How Do Different Wood Types Affect the Cutting Process on a Table Saw?
The type of wood significantly influences the cutting process on a table saw, particularly when it comes to cutting thin strips.
- Softwoods: Softwoods, such as pine or cedar, are generally easier to cut and require less power from the saw compared to hardwoods.
- Hardwoods: Hardwoods, like oak or maple, are denser and can produce more friction, which may lead to burning or chipping when cutting thin strips.
- Plywood: Plywood, made from thin layers of wood veneer, can be more stable during cutting but may splinter if not cut correctly, requiring a fine-tooth blade for best results.
- Engineered Woods: Engineered woods, like MDF or particleboard, can cut cleanly but may produce a lot of dust and require a sharp blade to prevent tearing.
- Exotic Woods: Exotic woods can be challenging due to their density and unique grain patterns, which can cause the blade to bind or lead to uneven cuts if not approached with care.
Softwoods, such as pine or cedar, are generally easier to cut and require less power from the saw compared to hardwoods. Their lower density allows for smoother cuts, making them ideal for beginners or for projects where precision is key.
Hardwoods, like oak or maple, are denser and can produce more friction, which may lead to burning or chipping when cutting thin strips. It’s essential to use a high-quality blade and adjust the feed rate to accommodate the toughness of the material.
Plywood, made from thin layers of wood veneer, can be more stable during cutting but may splinter if not cut correctly, requiring a fine-tooth blade for best results. Ensuring the plywood is adequately supported can help minimize splintering and achieve cleaner edges.
Engineered woods, like MDF or particleboard, can cut cleanly but may produce a lot of dust and require a sharp blade to prevent tearing. Using a zero-clearance insert can help reduce tear-out and improve the quality of the cut.
Exotic woods can be challenging due to their density and unique grain patterns, which can cause the blade to bind or lead to uneven cuts if not approached with care. Proper blade selection and technique are crucial to achieving a smooth finish on these materials.
Related Post: